Book review IBM Websphere Portal 8: Web Experience Factory and the Cloud
It seems that IBM is investing a lot in IBM Web Experience factory in last few years. I wanted to learn about WEF but the problem is i was not able to find any suitable documentation or something that will let me learn about WEF in step by step manner. Then before few days Packt publishing contacted me to review the IBM Websphere Portal 8: Web Experience Factory and the Cloud book. This book has lot of information about the architecture, analysis and design, release management in the first part. The part that i was most interested in was from chapter 7 to chapter 15 which covers the websphere experience factory development. I went through these chapters and really enjoyed reading them. I want to thank Packtpub for coming up with a book that helped me learn about WebSphere experience factory
Securing REST service created using WEF
In the Exposing REST + JSON endpoint using WEF i blogged about how to create a REST + JSON endpoint using WEF, but problem with that service is it is not protected. Anyone can call that service if you know the URL. So i wanted to protect the service and once the service is protected i can get the logged in user's information in the service.
I followed these steps to secure the service
Open the
After saving your changes deploy them on server
Once your application is deployed you will have to map the roles using WAS Admin Console before it actually get secured, so login into the WAS admin console and find the application that you want to secure and go to its Security Role to user/group mapping page and map

After saving your changes restart the application.
Now if you take the service URL and paste it in new browser window, it will redirect you to login page like this
 Login on this page, In my case only user i have is

- First i changed the HelloWorldService.sayHello() method so that instead of asking user for name it reads the current logged in users name and returns it in
Hello nameformatpackage com.webspherenotes.wef; import com.bowstreet.webapp.WebAppAccess; public class HelloWorldService { public String sayHello(WebAppAccess webAppAccess){ System.out.println("Entering HelloWorldService.sayHello()"); String userId = webAppAccess.getUserInfo().getUserID(); System.out.println("Value of userId " + userId); return "Hello " + userId; } } - If you look at the web.xml file of your WEF project you will notice that it has 3 servlets, out of that
WebEngineServletis the one that is used to expose REST service, In order to protect the REST service, you will want to protect the

WebEngineServlet , if you look into web.xml file generated by web.xml it has 4 security constraints in it, you can use one of them to protect the WebEngineServlet. This is how the out of box SecurityConstraint_4 looks like
<security-constraint id="SecurityConstraint_4">
   <web-resource-collection id="WebResourceCollection_4">
      <web-resource-name>ProtectedSampleModels</web-resource-name>
      <url-pattern>/webengine/factory/samples/protectedSamples/*</url-pattern>
   </web-resource-collection>
    <auth-constraint id="AuthConstraint_4">
         <description>Roles allowed to execute sample protected models under
        factory/samples/protectedSamples</description>
         <role-name>IBMAdministrators</role-name>
         <role-name>AllAuthenticatedUsers</role-name>
    </auth-constraint>
</security-constraint>
/webengine/* URL instead of only protectedSamples, but if i make chanes in web.xml directly they will get overwritten during regeneration. Instead if you want to make any changes that would be included in generated web.xml you should make those changes in \WebContent\WEB-INF\bin\deployment\standalone.web.xml file
\WebContent\WEB-INF\bin\deployment\standalone.web.xml file, and change SecurityConstraint_4 look like this
<security-constraint id="SecurityConstraint_4">
   <web-resource-collection id="WebResourceCollection_4">
      <web-resource-name>ProtectedSampleModels</web-resource-name>
      <url-pattern>/webengine/*</url-pattern>
   </web-resource-collection>
    <auth-constraint id="AuthConstraint_4">
         <description>Roles allowed to execute sample protected models under
        factory/samples/protectedSamples</description>
         <role-name>IBMAdministrators</role-name>
         <role-name>AllAuthenticatedUsers</role-name>
    </auth-constraint>
</security-constraint>
AllAuthenticatedUser to All Authenticated in Applications's Realm group like this


wpsadmin so use it to login and then you can get the service page like this

Exposing REST + JSON endpoint using WEF
I wanted to figure out how to create a REST + JSON end point using WEF. So i decided to create a simple Java class that has
 The HelloWorldService has only one operation sayHello so you get only one method listed here, select that method, you should get a page that lets you invoke the service
 On this page enter a name and click on invoke service button and you should get JSON result like this

sayHello(name) method, this method takes name as input and when you invoke it it returns Hello name as output
These are the steps that i followed
-
I did create a HelloWorldService.java class like this
package com.webspherenotes.wef; public class HelloWorldService { public String sayHello(String name){ System.out.println("Inside HelloWorldService.sayHello() Name = " + name); return "Hello " + name; } } - Next i did create one empty model and i did name it HelloWorldServiceProvider.model
- THen in the HelloWorldServiceProvider.model i did add one Linked Java Object that points to HelloWorldService class like this

- Define HelloWorldService using Service Definition builder like this

- Now define
sayHello()operation in the HelloWorldService using Service Operation builder like this
- With this we have a Service Provider model, Now we need to consumer it and expose it as REST Service, For that create another empty model called HelloWorldRESTService.model
- Add Service Consumer builder in the HelloWorldServiceConsumer.model like this

- Add a REST Service Enable builder in this model and expose it as JSON like this

- Now your application is ready so publish it on server


Using portletHelper linked java object
The Web Experience factory tries to hide the portlet request phases from you. But some time you might be interested in knowing what phase your Linked Java object method is getting executed, If that's the case you should use
 In your Linked Java Object you can call methods of

portletHelper Linked Java Object.
So as soon as you add a Portlet Adapter builder to your model, the WPF will add portletHelper Linked Java Object to that model like this

portletHelper LJO like this
public class PortletHelperDemoLJO {

 public String sayHello(WebAppAccess webAppAccess){
  System.out.println("Inside PortletHelperDemo.sayHello() ");
  System.out.println("portletHelper.isPortletActionRequest -> " +webAppAccess.processAction("portletHelper.isPortletActionRequest"));
  System.out.println("portletHelper.isPortletRenderRequest -> " +webAppAccess.processAction("portletHelper.isPortletRenderRequest"));
  return "Hello from PortletHelperDemoLJO.sayHello() " + webAppAccess.getCurrentPage();
 }

}

Use Worklight to encrypt the data stored in window.localStorage
In the Reading data stored in localStroage by Android Device or Google Chrome Browser entry i talked about how easy it is to read data stored by web application in the window.localStorage object. WOrklight provides alternative which is to use a Encrypted cache that still uses
 First i did build a simple HTML file like this
 Also in the local browser i can not read the values stored in the encryptedCache

window.localStorage object to store the data but encrypts the actual data to make it harder for someone else to read that data, even if they get access to your mobile or desktop. I wanted to try this feature out so i built this simple application which lets me store and read data from encrypted cache

<!DOCTYPE html>
<html>
  <head>
    <meta charset="utf-8" />
    <meta name="viewport" content="width=device-width,
    initial-scale=1.0, maximum-scale=1.0, minimum-scale=1.0, user-scalable=0" />
    <title>HelloEncryptedCache</title>
    <link rel="shortcut icon" href="images/favicon.png" />
    <link rel="apple-touch-icon" href="images/apple-touch-icon.png" />
    <link rel="stylesheet" href="css/reset.css" />
    <link rel="stylesheet" href="css/HelloEncryptedCache.css" />
  </head>
  <body onload="WL.Client.init({})" id="content" style="display: none">
    <h1>Encrypted Cache</h1>
    <table>
      <tr>
        <td>Encryption Key</td>
        <td><input type="text" name='encryptionKey' id="encryptionKey" /></td>
      </tr>
      <tr>
        <td><button id="openCache">Open Cache</button></td>
        <td><button id="closeCache">Close Cache</button></td>
      </tr>
      <tr>
        <td><button id="destroyCache">Destroy Cache</button></td>
      </tr>
      <tr>
        <td>Key</td>
        <td><input type="text" name='key' id="key" /></td>
      </tr>
      <tr>
        <td>value</td>
        <td><input type="text" name='value' id="value" /></td>
      </tr>
      <tr>
        <td><button id="encryptKey">Encrypt Key/Value</button></td>
        <td><button id="decryptKey">Decrypt Key</button></td>
      </tr>
      <tr>
        <td><button id="removeKey">Remove key</button></td>
      </tr>
    </table>
    <script src="js/HelloEncryptedCache.js"></script>
    <script src="js/messages.js"></script>
    <script src="js/auth.js"></script>
  </body>
</html>
window.$ = WLJQ;

function wlCommonInit(){
  $("#openCache").click(function(){
    console.log('The openCache button is clicked ' +$("#encryptionKey").val());
    WL.EncryptedCache.open($("#encryptionKey").val(), true, function(){
      console.log('The cache key opened successfully');
    },onOpenError);
  });
  $("#closeCache").click(function(){
    console.log('The closeCache button is clicked');
    WL.EncryptedCache.close(function(){
      console.log('The cache is closed successfully');
    });
  });
  $("#destroyCache").click(function(){
    console.log('The destroyCache button is clicked');
    WL.EncryptedCache.destroy(function(){
      console.log('Successfully destroyed the encrypted cache');
    });
  });
  $("#encryptKey").click(function(){
    console.log('The encryptKey button is clicked');
    WL.EncryptedCache.write($("#key").val(), $("#value").val(), function() {
      console.log('The entry written successfully');
    }, function(status){
      console.log('There was error in encryptingKey ' + status);
      switch(status){
      case WL.EncryptedCache.ERROR_KEY_CREATION_IN_PROGRESS:
        console.log('Error in key creation process');
        break;
      case WL.EncryptedCache.ERROR_LOCAL_STORAGE_NOT_SUPPORTED:
        console.log('Local storage is not supported');
        break;
      case WL.EncryptedCache.ERROR_NO_EOC:
        console.log('No EOC');
        break;
      case WL.EncryptedCache.ERROR_COULD_NOT_GENERATE_KEY:
        console.log('Could not generate key');
        break;
      case WL.EncryptedCache.ERROR_CREDENTIALS_MISMATCH:
        console.log('Credentials mismatch');
        break;
      }
    });
  });
  $("#decryptKey").click(function(){
    console.log('The decryptKey button is clicked');
    WL.EncryptedCache.read($('#key').val(), function(value) {
      console.log('Value from the encrypted cache is ' + value);
      alert('Encrypted value for the key -> ' + value);
    }, function(status){
      console.log('There was error in encryptingKey ' + status);
      switch(status){
      case WL.EncryptedCache.ERROR_KEY_CREATION_IN_PROGRESS:
        console.log('Error in key creation process');
        break;
      case WL.EncryptedCache.ERROR_LOCAL_STORAGE_NOT_SUPPORTED:
        console.log('Local storage is not supported');
        break;
      case WL.EncryptedCache.ERROR_NO_EOC:
        console.log('No EOC');
        break;
      case WL.EncryptedCache.ERROR_COULD_NOT_GENERATE_KEY:
        console.log('Could not generate key');
        break;
      case WL.EncryptedCache.ERROR_CREDENTIALS_MISMATCH:
        console.log('Credentials mismatch');
        break;
      }
    });
  });
  $("#removeKey").click(function(){
    console.log('The removeKey button is clicked');
    WL.EncryptedCache.remove($('#key').val(), function(){
      console.log('The encrypted key removed successfully ->' + $('#key').val() );
    })
  });
}
function onOpenError(status) {
  console.log("Inside onOpenError " + status);
  switch (status) {
  case WL.EncryptedCache.ERROR_KEY_CREATION_IN_PROGRESS:
    console.log("Error key creation in progress");
    break;
  case WL.EncryptedCache.ERROR_LOCAL_STORAGE_NOT_SUPPORTED:
    console.log("Error local storage not supported");
    break;
  case WL.EncryptedCache.ERROR_CREDENTIALS_MISMATCH:
    console.log("Error credentials mismatch");
    break;
  case WL.EncryptedCache.ERROR_SECURE_RANDOM_GENERATOR_UNAVAILABLE:
    console.log("Error secure random generator unavailable");
    break;
  case WL.EncryptedCache.ERROR_NO_EOC:
    console.log("Error no eoc");
    break;
  }
}
file_0.localstorage file from the device but i could not download it due to some file access level restrictions that android is putting on it.


Reading data stored in localStroage by Android Device or Google Chrome Browser
While working on my Using localStorage/sessionStorage in PhoneGap application example i was trying to debug a issue on the Android device where the data was not getting stored properly (Due to my programming mistake) and i wanted to figure out what data is actually getting stored so i used these steps.
- First i used the DDMS view in Eclipse to get access to the local file system on Andorid. All the data for an application is stored in andorid in
data/data/<apppackage>folder, In my case application package name iscom.HelloLocalStorageWhatever you store in
window.localStorageobject is actually stored in thedata/data/<apppackage>/app_database/file_0.localstoragefile, first download it to your computer. This file is actually SQLLite database, so if you open it in normal notepad you wont be able to read it. When you store data inlocalStroageobject in the Google chrome it gets stored inC:\Users\<username>\AppData\Local\Google\Chrome\User Data\Default\Local Storagedirectory. - If you want to open SQLLite database you will have to use one of the admin tools, i used the MikeTS SQLLite Management tool to open the file_0.localstorage file and it seems that Google Chrome stores the
localStoragedata inItemTable, that table has 2 columns one is key and other is value, when i queried theItemTablei could see the data stored in local preferences like this


Using localStorage/sessionStorage in PhoneGap application
The HTML 5 specification introduced 2 objects that can be used for storing data in key-value format on the client side, i wanted to try this feature out so i did create this simple Todo list web page that can be used to create a TO DO list.
This is how my Todo list application looks like
 This is the HTML page that i created for working with

 <!DOCTYPE html>
<html manifest="storage.appcache">
  <head>
    <title>Offline Application Example</title>
    <script type="text/javascript" charset="utf-8"
 src="jquery.js"></script>
    <script type="text/javascript" charset="utf-8">
    var storage = window.localStorage;
    $(document).ready(function(){
      console.log('Inside document.ready');
      initTodoList();
      $("#clearStorage").click(function(){
        console.log('Entering clearstorage');
        storage.clear();
        $('li').remove();
        console.log('Exiting clearstorage');
      });
    });
    function remove_item(key){
      console.log('Entering remove_item');
      storage.removeItem(key);
      console.log('Find and remove element with id = ' + key)
      $('#'+key).remove();
      console.log('Exiting remove_item');
    }
    function add_item() {
      console.log('Entering add_item');
      var d = new Date();
      var key = d.getTime();
      var value = $('#new_item').val();
      storage.setItem(key,value);
      createToDoListItem(key,value);
      $("#new_item").val('');
      console.log('Exiting add_item');
    }
    function initTodoList(){
      console.log("Entering initTodoList " + storage.length);
      for(var i = 0; i < storage.length; i++){
        var key = storage.key(i);
        var value = storage.getItem(key);
        createToDoListItem(key,value);
      }
    }
    function createToDoListItem(key, value){
      var html = '<li  data-key="'+key+'" id="'+key+'">'
      +value+'<button onclick="javascript:remove_item(\''+ key+ '\')"
   >Delete</button></li>';
      console.log('Appending html ' + html)
      $("#todo_list").append(html);
    }
    </script>
  </head>
  <body>
    <input type="text" id="new_item">
  <button onclick="add_item()">
  Add
  </button>
  <ul id="todo_list">
  </ul>
    <br/>
  <button id="clearStorage">Clear storage</button>
  </body>
</html>
You can use either localStorage, in which case the data is storage across browser restarts or you can use the sessionStorage in which case you will loose the TODO list once the browser is closed. All you have to do is change the value of var storage = either window.localStorage or window.sessionStorage

Chrome developer tools allows us to look at the data stored in the localStorage as well as remove that data.


Using custom login page with Worklight and JQuery Mobile
In the How to enable form based authentication in worklight application entry i talked about the steps that you must follow to enable the Form based authentication in the Worklight application, so that as soon as user logs in he gets prompted for the user name and password and once he logs in then he sees the application page.
I wanted to try this with jQuery Mobile, basic idea is that i will have multi page application with jQuery Mobile and then it will also have a login page, so when user visits the application for the first time he see's the login page and after login user can go to the Home page and traverse across different pages.
This is how my login page looks like
 Once user is logged in he will see the application page like this, there is logout button in the footer that let's user go back to login page.
I followed these steps to build my application
Once user is logged in he will see the application page like this, there is logout button in the footer that let's user go back to login page.
I followed these steps to build my application

- First i did follow the steps described in the How to enable form based authentication in worklight application entry to enable the Form based authentication for the user.
- Then i did change my html page to look like this, I am using CDN version of the jQuery Mobile so i dont have to manually add the necessary css and JavaScript in my project
The .html page has 4 div's representing 4 jQuery Mobile pages they are<!DOCTYPE html> <html> <head> <meta charset="utf-8" /> <meta name="viewport" content="width=device-width, initial-scale=1.0, maximum-scale=1.0, minimum-scale=1.0, user-scalable=0" /> <title>JQMLogin</title> <link rel="shortcut icon" href="images/favicon.png" /> <link rel="apple-touch-icon" href="images/apple-touch-icon.png" /> <link rel="stylesheet" href="css/reset.css" /> <link rel="stylesheet" href="http://code.jquery.com/mobile/1.1.0/jquery.mobile-1.1.0.min.css" /> </head> <body onload="WL.Client.init({})" id="content" style="display: none"> <div data-role="page" id="page1"> <div data-theme="a" data-role="header"> <h3>Autenticated Page - Page1</h3> </div> <div data-role="content"> <h3>You are logged in -Page1</h3> <a href="#page2">Go to page2</a> </div> <div data-theme="a" data-role="footer"> <input type="button" value="Logout" onclick="WL.Client.logout('SampleAppRealm', {onSuccess: WL.Client.reloadApp});" /> </div> </div> <div data-role="page" id="page2"> <div data-theme="a" data-role="header"> <h3>Autenticated Page - Page2</h3> </div> <div data-role="content"> <h3>You are logged in -Page2</h3> <a href="#page3">Go to page3</a> </div> <div data-theme="a" data-role="footer"> <input type="button" value="Logout" onclick="WL.Client.logout('SampleAppRealm', {onSuccess: WL.Client.reloadApp});" /> </div> </div> <div data-role="page" id="page3"> <div data-theme="a" data-role="header"> <h3>Autenticated Page - Page3</h3> </div> <div data-role="content"> <h3>You are logged in -Page3</h3> <a href="#page1">Go to page1</a> </div> <div data-theme="a" data-role="footer"> <input type="button" value="Logout" onclick="WL.Client.logout('SampleAppRealm', {onSuccess: WL.Client.reloadApp});" /> </div> </div> <div data-role="page" id="loginPage"> <div data-theme="a" data-role="header"> <h3>Hello JQuery Mobile</h3> </div> <div data-role="content"> <div id="loginForm"> Username:<br/> <input type="text" id="usernameInputField" autocorrect="off" autocapitalize="off" /><br /> Password:<br/> <input type="password" id="passwordInputField" autocorrect="off" autocapitalize="off"/><br/> <input type="button" id="loginButton" value="Login" /> </div> </div> <div data-theme="a" data-role="footer"> <h3>Copyright stuff</h3> </div> </div> <script src="js/JQMLogin.js"></script> <script src="js/messages.js"></script> <script src="js/auth.js"></script> <script src="http://code.jquery.com/mobile/1.1.0/jquery.mobile-1.1.0.min.js"></script> </body> </html>page1, page2, page3 and loginPage, the first 3 pages are pretty simple all they do is display link to other page and there is a logout button in the footer. TheloginPageis used to display login page to the user, it is set as 4th page so that it does not get displayed to the user by default, instead we use the logic in auth.js to manually display and hide the login page. -
This is how the auth.js file for my application looks like
Most of the code in auth.js is same as that of How to enable form based authentication in worklight application, but changes are in two functionsvar Authenticator = function() { var LOGIN_PAGE_SECURITY_INDICATOR = 'j_security_check'; var USERNAME_INPUT_ID = '#usernameInputField'; var PASSWORD_INPUT_ID = '#passwordInputField'; var LOGIN_BUTTON_ID = '#loginButton'; function onFormSubmit() { console.log("Entering auth.js.onFormSubmit()"); var reqURL = './' + LOGIN_PAGE_SECURITY_INDICATOR; var params = { j_username : $(USERNAME_INPUT_ID).val(), j_password : $(PASSWORD_INPUT_ID).val() }; onSubmitCallback(reqURL, {parameters:params}); } return { init : function() { console.log("Inside auth.js.init"); $(LOGIN_BUTTON_ID).bind('click', onFormSubmit); }, isLoginFormResponse : function(response) { console.log("Inside auth.js.isLoginFormResponse " + response.responseText); if (!response || response.responseText === null) { console .log("Entering auth.js.isLoginFormResponse (), return false"); return false; } var indicatorIdx = response.responseText .search(LOGIN_PAGE_SECURITY_INDICATOR); console.log("Entering auth.js.isLoginFormResponse (), return " + (indicatorIdx >= 0)); return (indicatorIdx >= 0); }, onBeforeLogin : function(response, username, onSubmit, onCancel) { console.log("Inside auth.js.onBeforeLogin"); onSubmitCallback = onSubmit; onCancelCallback = onCancel; if (typeof(username) != 'undefined' && username != null){ $(USERNAME_INPUT_ID).val(username); } else { $(USERNAME_INPUT_ID).val(''); } $(PASSWORD_INPUT_ID).val(''); }, onShowLogin : function() { console.log("Inside auth.js.onShowLogin"); $.mobile.changePage("#loginPage"); }, onHideLogin : function() { console.log("Inside auth.js.onHideLogin"); $.mobile.changePage("#page1"); } }; }();onShowLoginandonHideLogin()In theonShowLogin()function i am using jQuery Mobile javaScript code to change the page tologinPageand in theonHideLogin()method i am resetting the page back to page1, but once the user is logged in you can move between page1, page2 and page3 and it works.
Using jQuery/jQuery mobile in Worklight 5
In the Using JQuery Mobile in WorkLight application entry i talked about how to use JQuery Mobile in the Worklight application, that was using Worklight 4.2.1
In the Worklight 5.0 version one big change is that the JQuery Mobile framework comes out of the box with Worklight, and unlike before we dont have to manually include the jQuery framework on the page and we wont have to use the following code
<script>
  var jq = jQuery.noConflict();
</script>
window.$ and also assigns it to WLJQ global variable like this
window.$ = WLJQ;
function wlCommonInit(){
 // Common initialization code goes here
}
window.jQuery variable, so when you want to use jQUery mobile you have two options either you can include your own version of jQuery in addition to the one that comes OTB or you can modify the code like this
window.$ = WLJQ;
window.jQuery = WLJQ;
function wlCommonInit(){
 // Common initialization code goes here
}
How to enable form based authentication in worklight application
- The first step is to change the application-descriptor.xml file like this
I made one change in the application-descriptor.xml which is to add usage element with value of<?xml version="1.0" encoding="UTF-8"?> <!-- Attribute "id" must be identical to application folder name --> <application id="HelloWorklightAuthentication" platformVersion="5.0" xmlns="http://www.worklight.com/application-descriptor" xmlns:xsi="http://www.w3.org/2001/XMLSchema-instance"> <displayName>HelloWorklightAuthentication</displayName> <description>HelloWorklightAuthentication</description> <author> <name>application's author</name> <email>application author's e-mail</email> <copyright>Copyright My Company</copyright> <homepage>http://mycompany.com</homepage> </author> <height>460</height> <width>320</width> <mainFile>HelloWorklightAuthentication.html</mainFile> <thumbnailImage>common/images/thumbnail.png</thumbnailImage> <usage requireAuthentication="onStartup"> <realm name="SampleAppRealm"/> </usage> <worklightServerRootURL>http://${local.IPAddress}:8080</worklightServerRootURL> </application>requireAuthenticationequal toonStartupwhich means user will have to authenticate at the start of the application. The second change is to addrealmelement with value equal toSampleAppRealm - The
SampleAppRealmis defined in the authenticationConfig.xml file like this
The<?xml version="1.0" encoding="UTF-8"?> <tns:loginConfiguration xmlns:tns="http://www.worklight.com/auth/config" xmlns:xsi="http://www.w3.org/2001/XMLSchema-instance"> <realms> <realm name="SampleAppRealm" loginModule="StrongDummy"> <className>com.worklight.core.auth.ext.FormBasedAuthenticator</className> </realm> <realm name="WorklightConsole" loginModule="requireLogin"> <className>com.worklight.core.auth.ext.FormBasedAuthenticator</className> <onLoginUrl>/console</onLoginUrl> </realm> </realms> <loginModules> <loginModule name="StrongDummy" canBeResourceLogin="true" isIdentityAssociationKey="false"> <className>com.worklight.core.auth.ext.NonValidatingLoginModule</className> </loginModule> <loginModule name="requireLogin" canBeResourceLogin="true" isIdentityAssociationKey="true"> <className>com.worklight.core.auth.ext.SingleIdentityLoginModule</className> </loginModule> </loginModules> </tns:loginConfiguration>SampleAppRealmis configured to use FormBasedAuthentication, which means we will have to submit a form toj_security_checkURL and we will have to usej_usernameandj_passwordfield name for user name and password on the form TheSampleAppRealmusesStrongDummyasloginModulewhich usescom.worklight.core.auth.ext.NonValidatingLoginModuleclass for authenticating user name and password. theNonValidatingLoginModuleclass makes setup easy by not actually validating user name and password, which means no matter what user name and password you pass to it it will always say user logged in. -
Change the main .html file for the worklight application so that it looks like this, the basic idea is you should have one div for displaying login form and another for displaying regular application body. We will use JavaScript to check if user is already logged in, if no display login form to the user if no display normal application body.
<!DOCTYPE html> <html> <head> <meta charset="utf-8" /> <meta name="viewport" content="width=device-width, initial-scale=1.0, maximum-scale=1.0, minimum-scale=1.0, user-scalable=0" /> <title>HelloWorklightApp</title> <link rel="shortcut icon" href="images/favicon.png" /> <link rel="apple-touch-icon" href="images/apple-touch-icon.png" /> <link rel="stylesheet" href="css/reset.css" /> <link rel="stylesheet" href="css/HelloWorklightApp.css" /> </head> <body onload="WL.Client.init({showLogger:true})" id="content" style="display: none"> <div id="AppBody"> <h1>Your logged in </h1> <input type="button" value="Logout" onclick="WL.Client.logout('SampleAppRealm', {onSuccess: WL.Client.reloadApp});" /> </div> <div id="AuthBody"> <div id="loginForm"> Username:<br/> <input type="text" id="usernameInputField" autocorrect="off" autocapitalize="off" /><br /> Password:<br/> <input type="password" id="passwordInputField" autocorrect="off" autocapitalize="off"/><br/> <input type="button" id="loginButton" value="Login" /> </div> </div> <script src="js/HelloWorklightApp.js"></script> <script src="js/messages.js"></script> <script src="js/auth.js"></script> </body> </html>AppBodydiv displays the normal application body and theAuthBodydisplays the login form -
TheLast part is to change the auth.js file so that it looks like this var Authenticator = function () { var LOGIN_PAGE_SECURITY_INDICATOR = 'j_security_check'; var USERNAME_INPUT_ID = '#usernameInputField'; var PASSWORD_INPUT_ID = '#passwordInputField'; var LOGIN_BUTTON_ID = '#loginButton'; var onSubmitCallback = null; function onFormSubmit() { console.log("Entering auth.js.onFormSubmit()"); var reqURL = './' + LOGIN_PAGE_SECURITY_INDICATOR; var params = { j_username : $(USERNAME_INPUT_ID).val(), j_password : $(PASSWORD_INPUT_ID).val() }; onSubmitCallback(reqURL, {parameters:params}); } return { init : function () { console.log("Entering auth.js.init()"); $(LOGIN_BUTTON_ID).bind('click', onFormSubmit); }, isLoginFormResponse : function (response) { console.log("Entering auth.js.isLoginFormResponse () " + response); if (!response || response.responseText === null) { console.log("Entering auth.js.isLoginFormResponse (), return false"); return false; } var indicatorIdx = response.responseText.search(LOGIN_PAGE_SECURITY_INDICATOR); console.log("Entering auth.js.isLoginFormResponse (), return " + (indicatorIdx >= 0)); return (indicatorIdx >= 0); }, onBeforeLogin : function (response, username, onSubmit, onCancel) { console.log("Entering auth.js.onBeforeLogin()"); onSubmitCallback = onSubmit; onCancelCallback = onCancel; if (typeof(username) != 'undefined' && username != null){ $(USERNAME_INPUT_ID).val(username); } else { $(USERNAME_INPUT_ID).val(''); } $(PASSWORD_INPUT_ID).val(''); }, onShowLogin: function() { console.log("Entering auth.js.onShowLogin()"); $('#AppBody').hide(); $('#AuthBody').show(); }, onHideLogin: function(){ console.log("Entering auth.js.onHideLogin()"); $('#AppBody').show(); $('#AuthBody').hide(); } }; }();isLoginFormResponse()is the main method for the authentication framework, it gets called on each response to check if the user is authenticated. Inside this method check the response text to figure out if the user is already authenticated or not. TheonShowLogin()page method gets called if the user is not logged in, in that method hide the application body and hide the login form. TheonHideLogin()method gets called if the user is already logged in in that case hide the login form and display the body. TheonFormSubmit()gets called when user enter the user id and password and clicks submit, that method takes care of submitting the form using AJAX, worklight application is single page application so we cannot actually submit the form normally(I mean without ajax using browser's default form submit functionality)


PhoneGap/Cordova network connectivity information
The PhoneGap/Cordova framework allows us to get information about the device network status, i wanted to try this feature out so i used the following code in index.html
 I tried to test the network status related API in the android simulator but i could only test connected and disconnected status. To get the disconnected status i had to go to Setting and switch to airplane mode without wi-fi
<!DOCTYPE html>
<html>
  <head>
    <meta charset="utf-8" />
    <meta name="viewport" content="width=device-width,
  initial-scale=1.0, maximum-scale=1.0, minimum-scale=1.0, user-scalable=0" />
    <title>Hello Cordova</title>
    <link rel="shortcut icon" href="images/favicon.png" />
    <link rel="apple-touch-icon" href="images/apple-touch-icon.png" />
    <link rel="stylesheet" href="css/reset.css" />
    <link rel="stylesheet" href="css/HelloWorklightApp.css" />
  </head>
  <body >
  <h1>Hello Cordova</h1>
  <button id="networkStatus" >Get network statusind</button>
  <script src="js/cordova.js"></script>
  </body>
</html>
Get network status button and when you click on it the following JavaScript function gets executed which displays the current network status as alert.
$("#networkStatus").click(function(){
   var networkState = navigator.network.connection.type;
    var states = {};
    states[Connection.UNKNOWN]  = 'Unknown connection';
    states[Connection.ETHERNET] = 'Ethernet connection';
    states[Connection.WIFI]     = 'WiFi connection';
    states[Connection.CELL_2G]  = 'Cell 2G connection';
    states[Connection.CELL_3G]  = 'Cell 3G connection';
    states[Connection.CELL_4G]  = 'Cell 4G connection';
    states[Connection.NONE]     = 'No network connection';
    alert('Connection type: ' + states[networkState]);
});
 I tried to test the network status related API in the android simulator but i could only test connected and disconnected status. To get the disconnected status i had to go to Setting and switch to airplane mode without wi-fi
PhoneGap/Cordova batter status
The PhoneGap/Cordova framework has 3 events that your application can listen to get battery related information those events are 
batterystatus, batterylow, batterycritical
This is sample code that i have to listen to battery related events
document.addEventListener("deviceready", function(){
  window.addEventListener("batterystatus", function(info){
    console.log("Inside document.addeventlistener -batterystatus ");
    console.log("Battery level " + info.level);
    console.log("isPlugged " + info.isPlugged);
  }, false);
  window.addEventListener("batterylow", function(info){
    console.log("Inside document.addeventlistener -batterylow " );
    console.log("Battery level " + info.level);
    console.log("isPlugged " + info.isPlugged);
  }, false);
  window.addEventListener("batterycritical", function(info){
    console.log("Inside document.addeventlistener -batterycritical " );
    console.log("Battery level " + info.level);
    console.log("isPlugged " + info.isPlugged);
  }, false);
 }, false);

Events in PhoneGap/Cordova
The PhoneGap/Cordova framework allows us to listen to quite few different events, you can attach your event handler to event by using code like this

document.addEventListener("deviceready", function(){
 console.log("Inside document.addeventlistener -deviceready");
}, false);
document.addEventListener("pause", function(){
 console.log("Inside document.addeventlistener - pause");
}, false);
document.addEventListener("resume", function(){
 console.log("Inside document.addeventlistener - resume");
}, false);
document.addEventListener("online", function(){
 console.log("Inside document.addeventlistener - online");
}, false);
document.addEventListener("offline", function(){
 console.log("Inside document.addeventlistener - offline");
}, false);
document.addEventListener("backbutton", function(){
 console.log("Inside document.addeventlistener - backbutton");
}, false);
document.addEventListener("menubutton", function(){
 console.log("Inside document.addeventlistener - menubutton");
}, false);
document.addEventListener("searchbutton", function(){
 console.log("Inside document.addeventlistener - searchbutton");
}, false);
document.addEventListener("startcallbutton", function(){
 console.log("Inside document.addeventlistener - startcallbutton");
}, false);
document.addEventListener("endcallbutton", function(){
 console.log("Inside document.addeventlistener - endcallbutton");
}, false);
document.addEventListener("volumeupbutton", function(){
 console.log("Inside document.addeventlistener - volumeupbutton");
}, false);
document.addEventListener("volumedownbutton", function(){
 console.log("Inside document.addeventlistener - volumedownbutton");
}, false);
wlCommonInit() can play the same role and it works quite ok in worklight

Using embedded worklight browser simulator
The Worklight 50 studio comes with a very nice mobile browser simulator, you can access it by going to http://localhost:8080/console and clicking on the device related link
 It opens up a nice mobile browser simulator like this, you can use it to simulate multiple devices, use different Cordova functions.

 It opens up a nice mobile browser simulator like this, you can use it to simulate multiple devices, use different Cordova functions.

Notes about Embedded Jetty server inside Worklight Studio
The Worklight 50 simplifies development by embedding the Worklight server as plugin. It uses embedded Jetty server for running the worklight application. This makes starting, stopping server and deploying application to server much faster compared to before.
I noticed one problem with the Worklight embedded server which is that as soon as i start my IDE it starts embedded jetty on port 8080, which conflicts with others server application and so far i have not found a way to change this port number. Also when you try to stop the server from within worklight studio it does not actually stop the server.
 When you right click on your application and say "Build All and Deploy" it actually just copies the application in
  You can take a look at
 When you right click on your application and say "Build All and Deploy" it actually just copies the application in
 WorklightServerHome\<appname> directory. In that directory you can see few Jetty server related directories, there is also a log directory which has Jetty server related logs
 You can take a look at
 <workspace>\WorklightServerHome\<appname>\log\server.log for more details on the problems on server.
Worklight 50 release
IBM recently released release WorkLight 5, which is available for download from here. If you have IBM partner world account like me then you can download the Worklight server from partner world. Looks like IBM Worklight 5.0 has quite few new features
In my case i already have a PhoneGap development environment setup, so all i had to do was add http://public.dhe.ibm.com/ibmdl/export/pub/software/mobile-solutions/wor as Available site in Eclipse and it took care of installing Worklight studio and it comes with embedded Worklight server in it, so no need to install either Worklight server or database server separately.
Using jQUery .load(), ajax wrapper method
In the Posting data to REST service in PhoneGap/Cordova i talked about how to use jQuery to make a HTTP POST call to a REST service. In that case i used
$.post() method, But jQuery also provides one wrapper method load() that makes making AJAX call even simpler. I wanted to try that so i changed the sample to use the load().
The load() method works on jQuery selector, so it first makes AJAX request and then takes the response of AJAX method and inserts it in all the elements returns by the selector. In my case first i did create a HTTP form and when i click on it, i want to collect all the values entered by the user on the form and use them to make HTTP POST call and once the result it returned i want to insert it into html div with id equal to result. This single line of code does everything
$('div#result').load('http://192.168.1.101:9000/ManageContact/rest/contact',
   $("#insertContact :input"));
First i am selecting a div with id equal to result by using $('div#result') selector, the http://192.168.1.101:9000/ManageContact/rest/contact parameter is the URL to which the XHR request should be made. Second paramater $("#insertContact :input") says that select the form insertContact and return all the inputs on it in array format and submit them to the URL.
<!DOCTYPE html>
<html>
<head>
<title>Manage Contact</title>
<script src="http://code.jquery.com/jquery-1.6.4.min.js"></script>
<script type="text/javascript" charset="utf-8">
  $(document).ready(function(){
    $("#submit").click(insertContact);
    function insertContact(){
      console.log("Entering insertContact()");
      $('div#result').load('http://192.168.1.101:9000/ManageContact/rest/contact',
   $("#insertContact :input"));
      return false;
    }
  });
</script>
</head>
<body>
  <form id="insertContact">
    <table>
      <tr>
        <td>Contact Id</td>
        <td><input type="text" name="contactId" /></td>
      </tr>
      <tr>
        <td>First Name</td>
        <td><input type="text" name="firstName" /></td>
      </tr>
      <tr>
        <td>Last Name</td>
        <td><input type="text" name="lastName" /></td>
      </tr>
      <tr>
        <td>Email</td>
        <td><input type="text" name="email" /></td>
      </tr>
      <tr>
        <td><input type="submit" id="submit" name="submit"
  value="Submit" /></td>
      </tr>
    </table>
  </form>

  <div id='result'></div>

</body>
</html>
load() method looks at the second parameter to figure out if the request should be made using HTTP GET or POST. If i wanted to submit the form using HTTP GET i should have used
$('div#result').load('http://192.168.1.101:9000/ManageContact/rest/contact',
   $("#insertContact").serialize());
Adding support for back button in jQuery Mobile page in PhoneGap/Cordova application
When your building PhoneGap/Cordova application you might have noticed that it does not get browser back button. But if your using JQuery mobile you can take care of this situation by adding  This is the index.html file that i used for my application.
data-add-back-btn attribute at page level, I did that and this is screen show of how my page looks
 This is the index.html file that i used for my application.
<!DOCTYPE html>
<html>
<head>
<title>Device Properties Example</title>

<script type="text/javascript" charset="utf-8" src="cordova-1.7.0.js"></script>
<link rel="stylesheet"
  href="http://code.jquery.com/mobile/1.1.0/jquery.mobile-1.1.0.min.css" />
<script src="http://code.jquery.com/jquery-1.6.4.min.js"></script>
<script
  src="http://code.jquery.com/mobile/1.1.0/jquery.mobile-1.1.0.min.js"></script>

<script type="text/javascript" charset="utf-8">

</script>
</head>
<body>
  <div data-role="page" id="page1" data-add-back-btn="true"
  data-back-btn-text="Previous" data-title="First Page">
    <div data-theme="a" data-role="header">
      <h3>First Page</h3>
    </div>
    <div data-role="content">
      <a href="#page2">Go to page 2</a>
    </div>
    <div data-theme="a" data-role="footer">
      <h3>Copyright stuff</h3>
    </div>
  </div>

  <div data-role="page" id="page2" data-add-back-btn="true"
  data-back-btn-text="Previous" data-title="Second Page">
    <div data-theme="a" data-role="header">
      <h3>Second Page</h3>
    </div>
    <div data-role="content">
      <a href="#page3">Go to page 3</a>
    </div>
    <div data-theme="a" data-role="footer">
      <h3>Copyright stuff</h3>
    </div>
  </div>
    <div data-role="page" id="page3" data-add-back-btn="true"
 data-back-btn-text="Previous" data-title="Third Page">
    <div data-theme="a" data-role="header">
      <h3>Third page</h3>
    </div>
    <div data-role="content">
      <h3>Hello from page 3</h3>
    </div>
    <div data-theme="a" data-role="footer">
      <h3>Copyright stuff</h3>
    </div>
  </div>
</body>
</html>
data-add-back-btn which says that you want Jquery Mobile to manage back button when their is page in the history, you enable it by setting its value to true.
The data-back-btn-text attribute is used to set title of the back button, in my case i am setting it to Previous
Posting data to REST service in PhoneGap/Cordova
In the Consuming REST service from PhoneGap/Cordova entry i talked about how you can consume a REST service in PhoneGap/Cordova application using JQuery. In that application i was making a HTTP GET request to get data from REST service, i wanted to figure out how to make a HTTP POST call to REST service to create a new contact. You can download the index.html for my application from here
This is screen shot of how my form looks like

This is screen shot of success message that i get if the contact insertion is successful

I followed these steps to build the CordovaManageContact application

This is screen shot of success message that i get if the contact insertion is successful

I followed these steps to build the CordovaManageContact application
- I followed the instructions in Getting Started with Android to build application that points to index.html inside the application, i tried it once to make sure that it works
- Then i changed the index.html file for my application to look like this
When the user clicks on submit button control goes to<!DOCTYPE html> <html> <head> <title>Manage Contact</title> <script type="text/javascript" charset="utf-8" src="cordova-1.7.0.js"></script> <script src="http://code.jquery.com/jquery-1.6.4.min.js"></script> <script type="text/javascript" charset="utf-8"> $(document).ready(function(){ $("#submit").click(insertContact); }); function insertContact(){ console.log("Entering insertContact()"); $.post("http://192.168.1.101:9000/ManageContact/rest/contact", $("#insertContact :input").serializeArray(), function(json){ if(json== null || json == 'undefined') alert("Insert failed"); else alert("Insert successful"); }); return false; } </script> </head> <body> <h3>Insert Contact</h3> <form id="insertContact"> <table> <tr> <td>Contact Id</td> <td><input type="text" name="contactId" /></td> </tr> <tr> <td>First Name</td> <td><input type="text" name="firstName" /></td> </tr> <tr> <td>Last Name</td> <td><input type="text" name="lastName" /></td> </tr> <tr> <td>Email</td> <td><input type="text" name="email" /></td> </tr> <tr> <td><input type="submit" id="submit" name="submit" value="Submit" /></td> </tr> </table> </form> </body> </html>insertContact()method., In this method i am using jQuery$.post()call to submit the form tohttp://192.168.1.101:9000/ManageContact/rest/contactURL. I am using jQuery to collect all the values entered by the user into form and encode them by calling$("#insertContact :input").serializeArray()method. After the post request control goes to the anonymous function which is third parameter of the$.post()method. In that method i am checking if i got response if yes that means insert was successful if not that means insert failed, that is because my REST service is structured not to send anything back in case of insert failure.
Consuming REST service from PhoneGap/Cordova
In the Using JPA in REST web application deployed in Jetty entry i blogged about how to build a ManageContact JPA service which will allow me to perform CRUD operations on CONTACT table using a REST service. I wanted to figure out how i can consume this service from PhoneGap/Cordova application so i built this sample application which will call  I followed these steps to build the CordovaManageContact application
http://localhost:9000/ManageContact/rest/contact rest service, read the contact list returned in XML format, parse it and display contact list to the user, you can download the sample application from here
This screen shot displays the list of contacts that i got from the REST service
 I followed these steps to build the CordovaManageContact application
- I followed the instructions in Getting Started with Android to build application that points to index.html inside the application, i tried it once to make sure that it works
- Then i changed the index.html file for my application to look like this
When i click on the<!DOCTYPE html> <html> <head> <title>Device Properties Example</title> <script type="text/javascript" charset="utf-8" src="cordova-1.7.0.js"></script> <script src="js/jquery.js"></script> <script type="text/javascript" charset="utf-8"> $(document).ready(function(){ $("#getContactBtn").click(getContactList); }); function onDeviceReady() { console.log("Entering index.html.onDeviceReady"); getContactList(); console.log("Exiting index.html.onDeviceReady"); } function getContactList(){ console.log("Entering getContactList()"); $.ajax({ url : "http://192.168.1.101:9000/ManageContact/rest/contact", dataType:"xml", cache: false, error:function (xhr, ajaxOptions, thrownError){ debugger; alert(xhr.statusText); alert(thrownError); }, success : function(xml) { console.log("Entering getContactList.success()"); $(xml).find("contact").each(function() { var html = '<li>' + $(this).find("firstName").text() + ' ' + $(this).find("lastName").text() +'</li>'; $('#contactList').append(html); }); console.log("Exiting getContactList.success()"); } }); console.log("Exiting getContactList()"); } </script> </head> <body> <h3>Contact List</h3> <button id="getContactBtn">Get Contact</button> <ul id="contactList"></ul> </body> </html>Get Contactbutton thegetContactList()method gets called, it uses the jquery$.ajax()method to make a call and once the result is returned, it uses logic in thesuccessmethod to parse the xml and get all the contact records and adds each one of them as list item in thecontactListlist. I have the REST service running on my machine along with the Android emulator which has the PhoneGap application but when i tried to access the service athttp://localhost/ManageContact/rest/contact,http://127.0.0.1/ManageContact/rest/contactit did not work. I tried to map the ip address192.168.1.101todemohost.comin my host file but Android did not understand that mapping either. I had to use ipconfig command to figure out the ip address of the machine and then use it.
Enabling Request and Response logging in Jersey
I have been using Jersey as JAX-RS reference implementation for building REST services for last few days. And i wanted to enable logging so that it makes debugging easier.
It seems that Jersey allows us to enable Request and Response logging and once you enable that it starts printing request and response info. In order to use that all you have to do is change web.xml to add LoggingFilter on both request and response like this
 If you look into the generated log you can see both the request and response being printed like this

<!DOCTYPE web-app PUBLIC
 "-//Sun Microsystems, Inc.//DTD Web Application 2.3//EN"
 "http://java.sun.com/dtd/web-app_2_3.dtd" >

<web-app>
  <display-name>Archetype Created Web Application</display-name>
  <servlet>
    <servlet-name>Jersey Web Application</servlet-name>
    <servlet-class>com.sun.jersey.spi.container.servlet.ServletContainer</servlet-class>

    <init-param>
         <param-name>com.sun.jersey.spi.container.ContainerRequestFilters</param-name>
         <param-value>com.sun.jersey.api.container.filter.LoggingFilter</param-value>
     </init-param>
     <init-param>
         <param-name>com.sun.jersey.spi.container.ContainerResponseFilters</param-name>
         <param-value>com.sun.jersey.api.container.filter.LoggingFilter</param-value>
     </init-param>

 <init-param>
      <param-name>javax.ws.rs.Application</param-name>
      <param-value>com.webspherenotes.rest.ContactApplication</param-value>
    </init-param>

  </servlet>
  <servlet-mapping>
    <servlet-name>Jersey Web Application</servlet-name>
    <url-pattern>/rest/*</url-pattern>
  </servlet-mapping>

</web-app>
com.sun.jersey.api.container.filter.LoggingFilter can be used to enable loggin on either request or response or both as i am doing in this case.
Now if i hit a REST service by making GET call to http://localhost:9000/ManageContact/rest/contact/5 then the service returns JSON reso If you look into the generated log you can see both the request and response being printed like this

Securing REST service using annotations
In the Security REST service using web.xml entry i talked about how you can protect a REST service by adding security-constraint element in the web.xml. But JAXRS provides annotations that would give you more granular control over the REST services. I wanted to try that feature so i changed the same ManageContactApp to use the 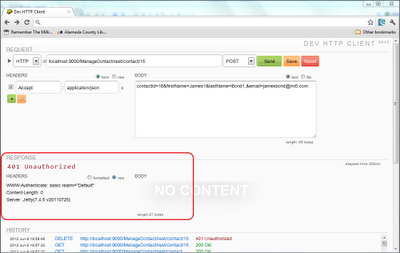 I followed these steps to build the sample application
javax.annotation.security annotations. You can download the sample application from here
When the user tries to insert a new record he will get prompted for basic authentication like this
 I followed these steps to build the sample application
- First i did download the basic ManageContactApp.zip that provides REST interface and i tested it to make sure that it works
- Next i used the instructions in Securing web application deployed in Jetty to make changes in Maven build file(pom.xml) to enable loginService in Jetty
<build> <finalName>JettySecurity</finalName> <plugins> <plugin> <groupId>org.mortbay.jetty</groupId> <artifactId>jetty-maven-plugin</artifactId> <version>7.4.5.v20110725</version> <configuration> <scanIntervalSeconds>10</scanIntervalSeconds> <webAppConfig> <contextPath>/JettySecurity</contextPath> </webAppConfig> <loginServices> <loginService implementation="org.eclipse.jetty.security.HashLoginService"> <name>Default</name> <config>${basedir}/src/main/resources/realm.properties</config> </loginService> </loginServices> <connectors> <connector implementation="org.eclipse.jetty.server.nio.SelectChannelConnector"> <port>9000</port> <maxIdleTime>60000</maxIdleTime> </connector> </connectors> </configuration> </plugin> </plugins> </build> - Next create realm.properties file in
${basedir}/src/main/resourcesdirectory which looks like this
This file has only 2 users first is guest and second is admin the admin user has ADMIN role.guest:guest admin:admin,ADMIN - Next change the web.xml file to declare the ADMIN role and define BASIC authentication scheme for the web application like this.
By default the Jersey implementation does not look for security annotations in your REST service, in order for that to work you must set value of<!DOCTYPE web-app PUBLIC "-//Sun Microsystems, Inc.//DTD Web Application 2.3//EN" "http://java.sun.com/dtd/web-app_2_3.dtd" > <web-app> <display-name>Archetype Created Web Application</display-name> <servlet> <servlet-name>Jersey Web Application</servlet-name> <servlet-class> com.sun.jersey.spi.container.servlet.ServletContainer</servlet-class> <init-param> <param-name>javax.ws.rs.Application</param-name> <param-value>com.webspherenotes.rest.ContactApplication</param-value> </init-param> <init-param> <param-name>com.sun.jersey.spi.container.ResourceFilters</param-name> <param-value> com.sun.jersey.api.container.filter.RolesAllowedResourceFilterFactory</param-value> </init-param> <load-on-startup>1</load-on-startup> </servlet> <servlet-mapping> <servlet-name>Jersey Web Application</servlet-name> <url-pattern>/rest/*</url-pattern> </servlet-mapping> <login-config> <auth-method>BASIC</auth-method> <realm-name>Default</realm-name> </login-config> <security-role> <role-name>ADMIN</role-name> </security-role> </web-app>com.sun.jersey.spi.container.ResourceFiltersinit parameter tocom.sun.jersey.api.container.filter.RolesAllowedResourceFilterFactorythis filter takes care of parsing and understandingPermitAll, RolesAllowed and DenyAllannotations - The last step is to change the ContactService.java to use the security related annotations at individual class and method level
By default all the methods are accessible to user. But i did addpackage com.webspherenotes.rest; import java.util.List; import javax.annotation.security.PermitAll; import javax.annotation.security.RolesAllowed; import javax.persistence.EntityManager; import javax.persistence.EntityManagerFactory; import javax.persistence.Query; import javax.ws.rs.Consumes; import javax.ws.rs.DELETE; import javax.ws.rs.FormParam; import javax.ws.rs.GET; import javax.ws.rs.POST; import javax.ws.rs.PUT; import javax.ws.rs.Path; import javax.ws.rs.PathParam; import javax.ws.rs.Produces; import javax.ws.rs.core.MediaType; import org.slf4j.Logger; import org.slf4j.LoggerFactory; @Path("/contact") public class ContactService { Logger logger = LoggerFactory.getLogger(ContactService.class); EntityManagerFactory entityManagerFactory; public ContactService(EntityManagerFactory entityManagerFactory){ this.entityManagerFactory=entityManagerFactory; } @GET @Produces({MediaType.APPLICATION_JSON,MediaType.APPLICATION_XML}) public ListgetContactList() { logger.debug("Entering ContactService.getContactList()"); EntityManager entityManager = entityManagerFactory.createEntityManager(); Query q = entityManager.createQuery("SELECT x from Contact x"); logger.debug("Exiting ContactService.getContactList()"); return (List ) q.getResultList(); } @GET @Path("/{contactId}") @Produces({MediaType.APPLICATION_JSON,MediaType.APPLICATION_XML}) public Contact getContact(@PathParam("contactId") int contactId) { logger.debug("Entering ContactService.getContact() contactId" + contactId); EntityManager entityManager = entityManagerFactory.createEntityManager(); Contact contact = entityManager.find(Contact.class, contactId); logger.debug("Exiting ContactService.getContact()" ); return contact; } @POST @Consumes(MediaType.APPLICATION_FORM_URLENCODED) @Produces({MediaType.APPLICATION_JSON,MediaType.APPLICATION_XML}) @RolesAllowed("ADMIN") public Contact insertContact(@FormParam("contactId") int contactId, @FormParam("firstName") String firstName, @FormParam("lastName") String lastName, @FormParam("email") String email) { logger.debug("Entering ContactService.insertContact()"); EntityManager entityManager = entityManagerFactory.createEntityManager(); Contact contact = new Contact(); contact.setContactId(contactId); contact.setFirstName(firstName); contact.setLastName(lastName); contact.setEmail(email); try{ entityManager.getTransaction().begin(); entityManager.persist(contact); entityManager.getTransaction().commit(); }catch(Throwable t){ if(entityManager.getTransaction().isActive()) entityManager.getTransaction().rollback(); contact = null; }finally{ entityManager.close(); } logger.debug("Exiting ContactService.insertContact()"); return contact; } @PUT @Path("/{contactId}") @Produces({MediaType.APPLICATION_JSON,MediaType.APPLICATION_XML}) @Consumes(MediaType.APPLICATION_FORM_URLENCODED) @RolesAllowed("ADMIN") public Contact updateContact(@PathParam("contactId") int contactId, @FormParam("firstName") String firstName, @FormParam("lastName") String lastName, @FormParam("email") String email) { logger.debug("Entering ContactService.update() contactId" + contactId); EntityManager entityManager = entityManagerFactory.createEntityManager(); Contact contact = new Contact(); contact.setContactId(contactId); contact.setFirstName(firstName); contact.setLastName(lastName); contact.setEmail(email); try{ entityManager.getTransaction().begin(); entityManager.merge(contact); entityManager.getTransaction().commit(); }catch(Throwable t){ if(entityManager.getTransaction().isActive()) entityManager.getTransaction().rollback(); contact = null; }finally{ entityManager.close(); } logger.debug("Exiting ContactService.updateContact()"); return contact; } @DELETE @Path("/{contactId}") @RolesAllowed("ADMIN") public void deleteContact(@PathParam("contactId") int contactId) { logger.debug("Entering ContactService.deleteContact() contactId " + contactId); EntityManager entityManager = entityManagerFactory.createEntityManager(); try{ entityManager.getTransaction().begin(); Contact contact = entityManager.find(Contact.class, contactId); logger.debug("remove contact " + contact); entityManager.remove(contact); logger.debug("After removing " + contact); entityManager.getTransaction().commit(); }catch(Throwable t){ if(entityManager.getTransaction().isActive()) entityManager.getTransaction().rollback(); }finally{ entityManager.close(); } logger.debug("Exiting ContactService.deleteContact()"); } } @RolesAllowed("ADMIN")toinsertContact(), updateContact() and deleteContact()method to say that only users who have admin rights can access these methods.
Security REST service using web.xml
In the Using JPA in REST web application deployed in Jetty entry i talked about how to create a REST service which uses JPA to interact with database. This service allows you to list, insert, update and delete records from CONTACT table. When you create a service that allows you to update your back end you might want to protect it so that only authorized user can update the database. I wanted to figure out how to protect the service so that every user can get list of contacts but only ADMIN user is able to modify the contacts by inserting, updating and deleting them. YOu can download the sample application that i developed from here
When the user tries to insert a new record he will get prompted for basic authentication like this
I followed these steps to build the sample application
I followed these steps to build the sample application
- First i did download the basic ManageContactApp.zip that provides REST interface and i tested it to make sure that it works
- Next i used the instructions in Securing web application deployed in Jetty to make changes in Maven build file(pom.xml) to enable loginService in Jetty
<build> <finalName>JettySecurity</finalName> <plugins> <plugin> <groupId>org.mortbay.jetty</groupId> <artifactId>jetty-maven-plugin</artifactId> <version>7.4.5.v20110725</version> <configuration> <scanIntervalSeconds>10</scanIntervalSeconds> <webAppConfig> <contextPath>/JettySecurity</contextPath> </webAppConfig> <loginServices> <loginService implementation="org.eclipse.jetty.security.HashLoginService"> <name>Default</name> <config>${basedir}/src/main/resources/realm.properties</config> </loginService> </loginServices> <connectors> <connector implementation="org.eclipse.jetty.server.nio.SelectChannelConnector"> <port>9000</port> <maxIdleTime>60000</maxIdleTime> </connector> </connectors> </configuration> </plugin> </plugins> </build> - Next create realm.properties file in
${basedir}/src/main/resourcesdirectory which looks like this
This file has only 2 users first is guest and second is admin the admin user has ADMIN role.guest:guest admin:admin,ADMIN - The next step is to make changes in web.xml to protect the appropriate HTTP method calls in web.xml like this
The most important change in web.xml is defining the security constraints for the<!DOCTYPE web-app PUBLIC "-//Sun Microsystems, Inc.//DTD Web Application 2.3//EN" "http://java.sun.com/dtd/web-app_2_3.dtd" > <web-app> <display-name>Archetype Created Web Application</display-name> <servlet> <servlet-name>Jersey Web Application</servlet-name> <servlet-class> com.sun.jersey.spi.container.servlet.ServletContainer</servlet-class> <init-param> <param-name>javax.ws.rs.Application</param-name> <param-value> com.webspherenotes.rest.ContactApplication</param-value> </init-param> <load-on-startup>1</load-on-startup> </servlet> <servlet-mapping> <servlet-name>Jersey Web Application</servlet-name> <url-pattern>/rest/*</url-pattern> </servlet-mapping> <security-constraint> <web-resource-collection> <web-resource-name>Create Contact</web-resource-name> <url-pattern>/rest/*</url-pattern> <http-method>POST</http-method> <http-method>PUT</http-method> <http-method>DELETE</http-method> </web-resource-collection> <auth-constraint> <role-name>ADMIN</role-name> </auth-constraint> </security-constraint> <login-config> <auth-method>BASIC</auth-method> <realm-name>Default</realm-name> </login-config> <security-role> <role-name>ADMIN</role-name> </security-role> </web-app>/restURL, which is the base URL for the REST service. The security constraint says that only allow those users who have ADMIN role access toPOST, PUT, DELETEHTTP methods on this URL. Thelogin-configelement says that use Basic authentication
mvn jetty:run and you will notice that you can get list of contacts but when you try to either insert a new contact or delete existing contact then you will get prompted for userid and password
Subscribe to:
Posts (Atom)