- Caching output of portlet
- Caching output of servlet
- Caching using distributed map
- Attaching invalidation listener to dyanacache
- Caching static resources of web application
- Storing custom java objects in Dynacache using CachableCommand
- How to use custom servlet cache instance for Custom Java Objects
- Controlling memory size of DynaCache
Information about DynaCache
So far i have published few blog entries about DynaCache, so i thought i should create one page with links to all the Dynamic caching information
Storing custom java objects in Dynacache using CachableCommand
The WebSphere Application Server provides DynaCache component that can be used for caching. You can use DynaCache for storing output of Servlet, portlet, JSP,...
But sometimes you might want to store Custom Java Objects for caching, if that's the case you should use
I wanted to learn how to use DynaCache for storing custom java objects so i built SampleCacheCommand application. This application has a
First create
When your creating a cache-able object you will have to follow these rules
I guess one disadvantage of the
In the servlet first i am reading the contactId parameter supplied by user and using the contactId to create a new object of the
In the
The last piece of puzzle is
In the cachespec.xml first we are setting value of
The
The value of
In the default installation of WAS or WebSPhere portal the dynamic caching service is disabled and as a result the CacheableContact object wont be cached. So use Enabling Dynamic Caching steps to enable the dynamic caching.
After deploying the application on server try invoking a servlet for different contactIds and then you can use the DynaCacheMonitor web app to see if the record is cached or not. By default the objects will go to

You can use the CacheMontior tool to even look at content of the cache entry. This part is inconsistent some time it shows only the address object and some times it shows the output of toString() method

But sometimes you might want to store Custom Java Objects for caching, if that's the case you should use
CacheableCommandImpl. Ex. Lets say your application makes a SQL query to database and you want to cache output of that query, or your application makes a Web Service call and you want to cache output of that web service call(DynaCache has a feature that lets you cache service request response similar to output of servlet or portlet).I wanted to learn how to use DynaCache for storing custom java objects so i built SampleCacheCommand application. This application has a
SampleCacheCommandServlet servlet that takes a ContactId has parameter and fires a SQL query to get Contact record for the supplied ContactId and caches that contact record. So next time when you make a request to SampleCacheCommandServlet servlet for same ContactId, that record would be served from cache instead of going to database.First create
CacheableContact.java like this, this object will be used for accessing the contact table data as well as for caching.
package com.webspherenotes.cache;

import java.sql.Connection;
import java.sql.DriverManager;
import java.sql.PreparedStatement;
import java.sql.ResultSet;

import com.ibm.websphere.command.CacheableCommandImpl;

public class CacheableContact extends CacheableCommandImpl {
    private static final long serialVersionUID = -8098013422300089468L;
    private int contactId;
    private String firstName;
    private String lastName;

    public CacheableContact(int contactId){
        this.contactId = contactId;
    }

    @Override
    public boolean isReadyToCallExecute() {
        return true;
    }

    @Override
    public void performExecute() throws Exception {
        Connection conn = null;
        try {
            System.out.println("Entering CacheableContact.performExecute()");
            Class.forName("org.apache.derby.jdbc.ClientDriver");
            conn =DriverManager.getConnection
   ("jdbc:derby://localhost:1527/sample;create=true", "admin", "admin");
            PreparedStatement stmt = conn.prepareStatement
   ("SELECT * FROM ADMIN.CONTACT WHERE CONTACTID=?");
            stmt.setInt(1, this.contactId);
            ResultSet rs= stmt.executeQuery();
            rs.next();
            this.firstName =rs.getString("FIRSTNAME");
            this.lastName = rs.getString("LASTNAME");
        } catch (Exception e) {
            e.printStackTrace(System.out);
        }finally{
            if(conn != null)
                conn.close();
        }
        System.out.println("Exiting CacheableContact.performExecute()");
    }

  public int getContactId() {
        return contactId;
    }
    public void setContactId(int contactId) {
        this.contactId = contactId;
    }
    public String getFirstName() {
        return firstName;
    }
    public String getLastName() {
        return lastName;
    }
    @Override
    public String toString() {
        return "CacheableContact [contactId=" + contactId + ", firstName="
                + firstName + ", lastName=" + lastName     + "]";
    }

}
When your creating a cache-able object you will have to follow these rules
- Create a Java class that extends
CacheableCommandImplclass, this class provides logic to cache data by providing life cycle for your class. TheCacheableCommandImplis abstract class so in order to make a concrete class you will have to override itsisReadyToCallExecute()andperformExecute()method - The
CacheableCommandImplclass provides life cycle for the cache-able object, it will call theisReadyToCallExecute()method of your class to check if your class is ready to execute. You can use this method to check if your data access part is ready. Ex. if your accessing database you can check in this method if database connection is not null, if your talking to web service then use this method to check if you can get connection to web service. If this method returns true then only the flow will move forward, if it returns false exception will be thrown - The
performExecute()method of your class is where you write your data access code, In my case i want to make query database for supplied contactId and once the record is returned i used the values to populate instance variables of theCacheableContactclass.
I guess one disadvantage of the
CacheableCommandImpl class is that it is little difficult to understand how it works but once i understood how it works in think its a very good pattern to structure your code as well. Lets take a look at the SampleCacheCommandServlet code to see how the CacheableContact object is used that will make it easier to understand
package com.webspherenotes.cache;

import java.io.IOException;
import javax.servlet.ServletException;
import javax.servlet.http.HttpServlet;
import javax.servlet.http.HttpServletRequest;
import javax.servlet.http.HttpServletResponse;

import com.ibm.websphere.command.CommandException;

/**
 * Servlet implementation class SampleCacheCommandServlet
 */
public class SampleCacheCommandServlet extends HttpServlet {
   private static final long serialVersionUID = 1L;

   protected void doGet(HttpServletRequest request, HttpServletResponse response)
   throws ServletException, IOException {
      response.setContentType("text/html");
      int contactId = Integer.parseInt(request.getParameter("contactId"));
      CacheableContact cacheableContact = new CacheableContact(contactId);
      try {
         cacheableContact.execute();
         String firstName = cacheableContact.getFirstName();
         String lastName = cacheableContact.getLastName();
         response.getWriter().println("
"+firstName+"  " + lastName);
      } catch (CommandException e) {
         e.printStackTrace();
      }

   }
}
In the servlet first i am reading the contactId parameter supplied by user and using the contactId to create a new object of the
CacheableContact, then i am calling its execute() method, if you look at CacheableContact code you will notice that we are not overriding its execute() method. The execute() method is provided by the super class and its the place where the life cycle of cache is provided. The execute() method checks if there is object in cache for the contactId(ContactId is primary key that we configure in the cachespec.xml) if yes it will return the CacheableContact object in the cache for that contactId if its not there in the cache it will call performExecute() method of CacheableContact object and once the result is returned it will store the instance of CacheableContact in DynaCache for the contactId. In the
SampleCacheCommandServlet code once execute() method is called we can assume that the CacheableContact object is ready and use its getter methods to read firstName and lastName.The last piece of puzzle is
cachespec.xml, This xml file is used to configure the caching of CacheableContact object. You can create a cachespec.xml in the WEB-INF folder of your web application.
<?xml version="1.0" ?>
<!DOCTYPE cache SYSTEM "cachespec.dtd">
<cache>
  <cache-entry>
    <class> command</class>
       <sharing-policy>not-shared</sharing-policy>
       <name> com.webspherenotes.cache.CacheableContact.class</name>
       <cache-id>
          <component type="method" id="getContactId">
             <required>true</required >
          </component>
          <priority>1</priority>
             <timeout>180</timeout >
          </cache-id>
   </cache-entry>
</cache>
In the cachespec.xml first we are setting value of
class to command, to let DynaCache know that we want to cache a custom java object. The value of name attribute is fully qualified name of the Java object with .class prefix. The
cache-id element is used to define how to generate unique cache key for the cache-able object. In my case i want to use the contactId as caching key and since the DynaCache can use getContactId() key to get the caching key i configure the key like this
<component type="method" id="getContactId">
   <required>true</required >
</component>
The value of
timeout element equal to 180 means this cache entry is valid only for 180 seconds.In the default installation of WAS or WebSPhere portal the dynamic caching service is disabled and as a result the CacheableContact object wont be cached. So use Enabling Dynamic Caching steps to enable the dynamic caching.
After deploying the application on server try invoking a servlet for different contactIds and then you can use the DynaCacheMonitor web app to see if the record is cached or not. By default the objects will go to
baseCache instance 
You can use the CacheMontior tool to even look at content of the cache entry. This part is inconsistent some time it shows only the address object and some times it shows the output of toString() method

Using visibility rule to show or hide a portlet page
In the How to show or hide a portal or portlet page in WebSphere Portal entry i talked about how to create a Application Object and create a visibility rule. Then in the Using visibility rule to show or hide a portal page entry i blogged about how to show or hide a portal page. So i wanted to check how to show or hide a portlet based on Sample Visibility rule that i created
Now you can execute the rule by going to the page that has visibility rule
- First go to "Manage Pages" Portlet and click on the edit button to reach the Edit Layout page, it has Show Portlet Rule Mapping link in the top right corner, click on that link

- Once you click on the link every portlet on the page will get No Rule Mapped link like this, when you click on it you will get a menu that will let you select a visibility rule

- Once you select the rule it will bring you back to the Edit Page Layout portlet and show the rule that is assigned to the portlet instance on the page

- Save the page and your done


Now you can execute the rule by going to the page that has visibility rule
Using visibility rule to show or hide a portal page
In the How to show or hide a portal or portlet page in WebSphere Portal entry i blogged about what is visibility rule and how you can use it to show or hide a portlet or page and we also build a visibility rule.
In this entry i will outline steps that you will have to take to assign the visibility rule to the page.
Important Note: Once the visibility rule is attached to the page it will get executed every time that page is displayed to the user. Please note that visibility rule does not compete with user access control instead it compliments it. Portal always checks if the user has rights to view a page or not before executing the visibility rule.
I wanted to assign the visibility rule to a Demo page and i followed these steps for that
Now you should be able to test your visibility rule by visiting the page
In this entry i will outline steps that you will have to take to assign the visibility rule to the page.
Important Note: Once the visibility rule is attached to the page it will get executed every time that page is displayed to the user. Please note that visibility rule does not compete with user access control instead it compliments it. Portal always checks if the user has rights to view a page or not before executing the visibility rule.
I wanted to assign the visibility rule to a Demo page and i followed these steps for that
- I went to the Manage Pages portlet, selected the Demo page and clicked on its properties button to get Page properties view like this.

- Click on the Select rule button and it will open a personalization picker portlet with list of visibility rules like this

- Once the rule is selected you can see that selected rule

- Save the page and the rule should be applied to the page


Now you should be able to test your visibility rule by visiting the page
How to show or hide a portal or portlet page in WebSphere Portal
One of the common requirements in WebSphere Portal Server is how do i show/hide particular portlet or portal page. You might want to show particular page say every Monday or only to those users for whom value of particular email attribute say city is San Francisco. Or you might want to implement some custom logic ex. you might have a table in database which has information such as role and you might want to say if role is say Manager in database then only show a portlet or page.
WebSphere Portal has concept of Visibility rule, so you can create a visibility rule and assign it to particular portlet on a page and when portal is displaying that page to user it will execute the visibility rule to decide if a portlet should be displayed to the user or not. While creating the visibility rule you can use one of the built in criteria for portal or you can create your own Java class that will get executed as a part of visibility rule and your Java class will decide if the particular portlet will be displayed to the user or not. I wanted to try this feature so i followed these steps
With this your visibility rule is in place now the next step would be to assign it to either page or portlet depending on what you want to show or hide.
WebSphere Portal has concept of Visibility rule, so you can create a visibility rule and assign it to particular portlet on a page and when portal is displaying that page to user it will execute the visibility rule to decide if a portlet should be displayed to the user or not. While creating the visibility rule you can use one of the built in criteria for portal or you can create your own Java class that will get executed as a part of visibility rule and your Java class will decide if the particular portlet will be displayed to the user or not. I wanted to try this feature so i followed these steps
- First create a SampleApplicationObject java project and then create a SampleApplicationObject.java first which looks like this in it.
package com.webspherenotes.pzn;

import com.ibm.websphere.personalization.RequestContext;
import com.ibm.websphere.personalization.applicationObjects.SelfInitializingApplicationObject;


public class SampleApplicationObject implements SelfInitializingApplicationObject{

  private RequestContext requestContext;

  @Override
  public void init(RequestContext requestContext) {
    this.requestContext = requestContext;
    requestContext.setSessionAttribute("sampleobject", this);
  }

  public String getUserName() {
    System.out.println("Value returned from User Name " + requestContext.getRemoteUser());
    return requestContext.getRemoteUser();
  }

}
The SampleApplicationObject is extended from the SelfInitializationApplicationObject and it has init() method which gets called to give this object a chance to initialize itself. In the init() method it will get access to object of RequestContext class which has some methods that you can use to get access to the environment.
I also have a getUserName() method in this class which returns name of the user for whom this rule is getting executed. Similarly you can add more methods to this class that follow JavaBean specification to return more values.
Add pznresources.jar and pznruntime.jar which are located in WebSphere\PortalServer\pzn\prereq.pzn\lib as part of your project build path- Export this java class and content of the project as .jar file and copy the exported jar in \WebSphere\PortalServer\pzn\prereq.pzn\collections directory
- Restart the Portal Server
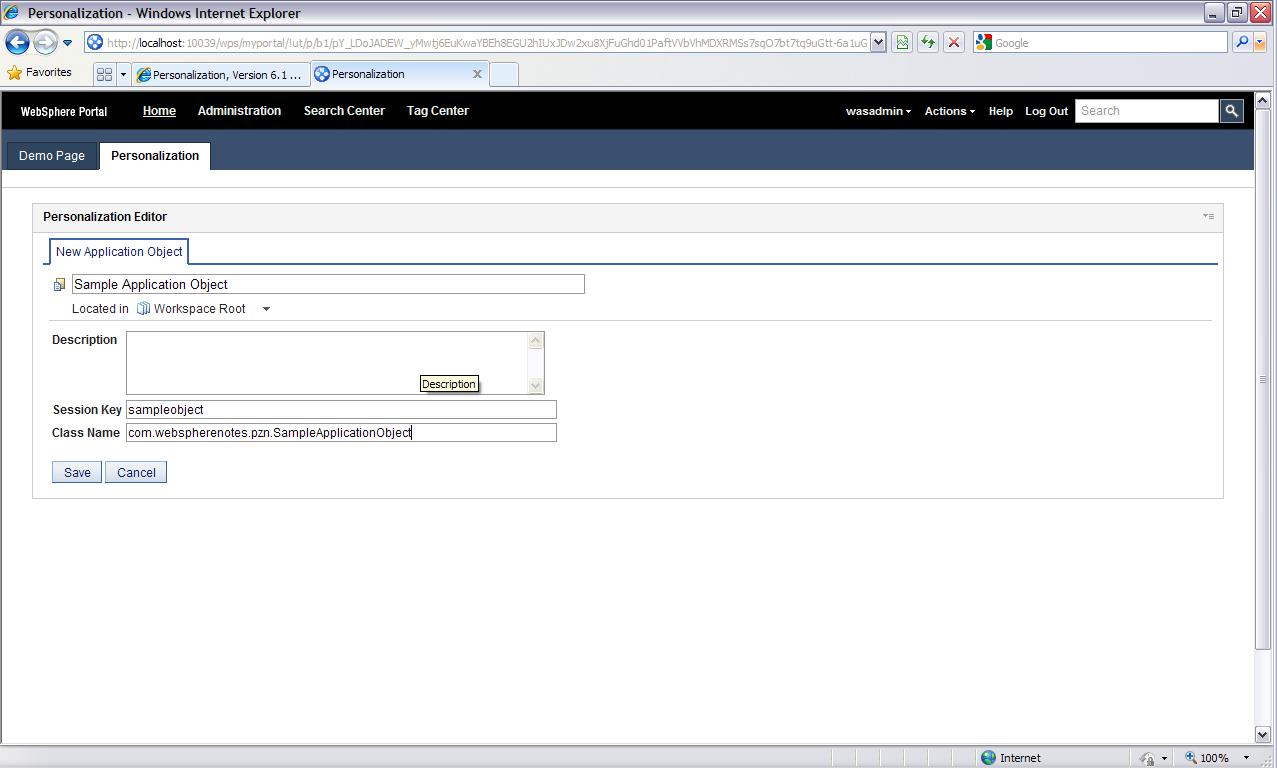
- Once the portal server is started login and go to the portal page which has Personalization Navigator and Personalization Editor portlet on it. In the Personalization Navigator portlet click on New -< Application Object and it will open a New Application Object screen like this.

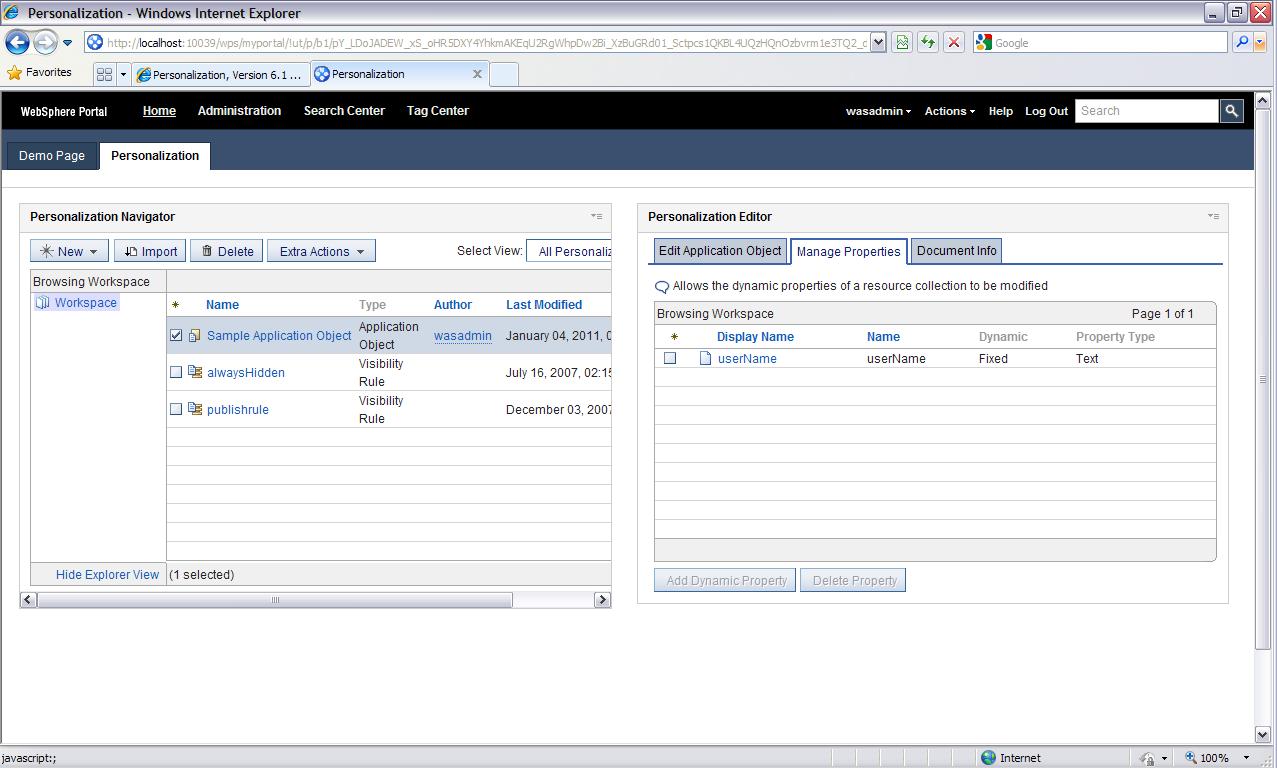
Enter fully qualified class name as well as session key name that you used for storing the object in session here. - Once the Sample Application Object is created go the Editor screen of the page and you should see the userName property that your java class is exposing like this

- Once the Sample Application Object is ready you can use it for creating sample visibility rule. For that go to the Personalization Navigator Portlet click on New -< Rule. It will open a Rules Editor page like this. In that change type of the rule to Visibility rule

- The Rules editor is active editor in that if you click on the Attributes link it will open all the different attributes that are available for creating rules. We can also see our custom Select Application Object, If you select that it will show userName property so select that and set "wasadmin" as value. I am setting wasadmin as user because thats the userName that i want to use for testing, you can set some other value here


With this your visibility rule is in place now the next step would be to assign it to either page or portlet depending on what you want to show or hide.
Subscribe to:
Posts (Atom)