WebSphere Portal (WP) has some specific requirements for the format and content of URL used by this application. Furthermore the WebSphere Portal URLs are not human decipherable or dependant on site taxonomy. One example of a typical WP version 6 URL might look like the following:
http://www.mycompany.com/wps/myportal/!ut/p/c1/04_SB8K8xLLM9MSSzPy8xBz9CP0os3hLRydHL1MjYwN3dyNXA6MAD3c_V2M_YwMDA30_j_zcVP2CbEdFAHUwnMg!/
The basic building blocks of this URL are defined as follows:
<protocol>://<hostname>:<port>/<portal-context>/<security-context>/[<virtual-portal-alias>]/[<portal-params>]
All elements of this URL are important to the portal server to ensure that the request is properly processed and it is very difficult to hide or manipulate any
<protocol> – This is the protocol used by the request in our case HTTP or HTTPS
<hostname> - This is the DNS resolvable host name of the entry point to our portal application
<port> - This is the port that the WebSphere Portal HTTP listener will be bound to and is often left off on a browser URL designating the port as either the default HTTP port 80 or HTTPS port 443. Any other port would need to be properly designated in the URL
<portal-context> - Portal Context is the part of the URL that determines which application on the WebSphere Server will service the request. The default for WebSphere Portal is wps
<security-context> - Security Context is the part of the URL that determines whether the user is request the anonymous or secure view of a given portal navigational element like a page. The default contexts are portal for the anonymous version and myportal for the secure version
<virtual-portal-alias> - Virtual Portal Alias (VP alias) is only relevant when the WebSphere Portal environment uses Virtual Portals. The Cisco Enterprise Portal (CEP) environment leverages the VP alias to do routing of requests to applications based on predefined service level agreement rules and
Portlet Wiring Tool
The Portlet Wiring Tool allows you to configure connections, or wires, between cooperative portlets. You can access the Portlet Wiring tool for a page by going to Edit Layout section of a page and then going to Wires tab. You should get a screen like this
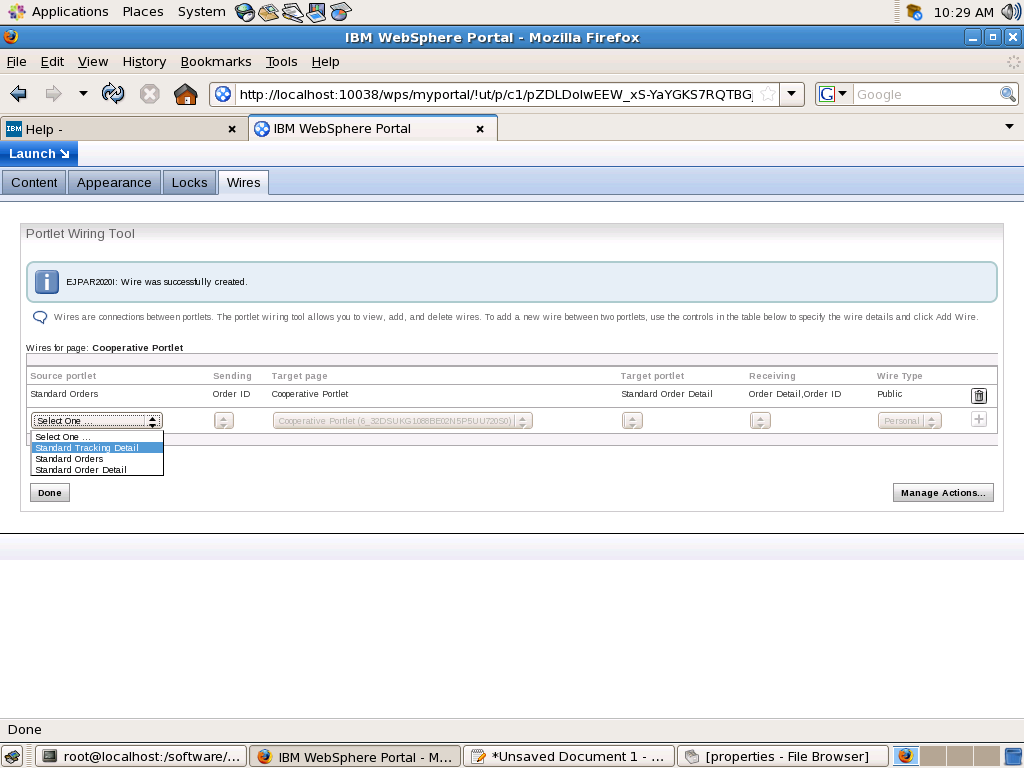
The Portlet Wiring Tool allows you to view the properties that portlets on the page can send or receive. If a match is available between two portlets, you can create a
wire between the two portlets. Existing wires may also be deleted using the tool..
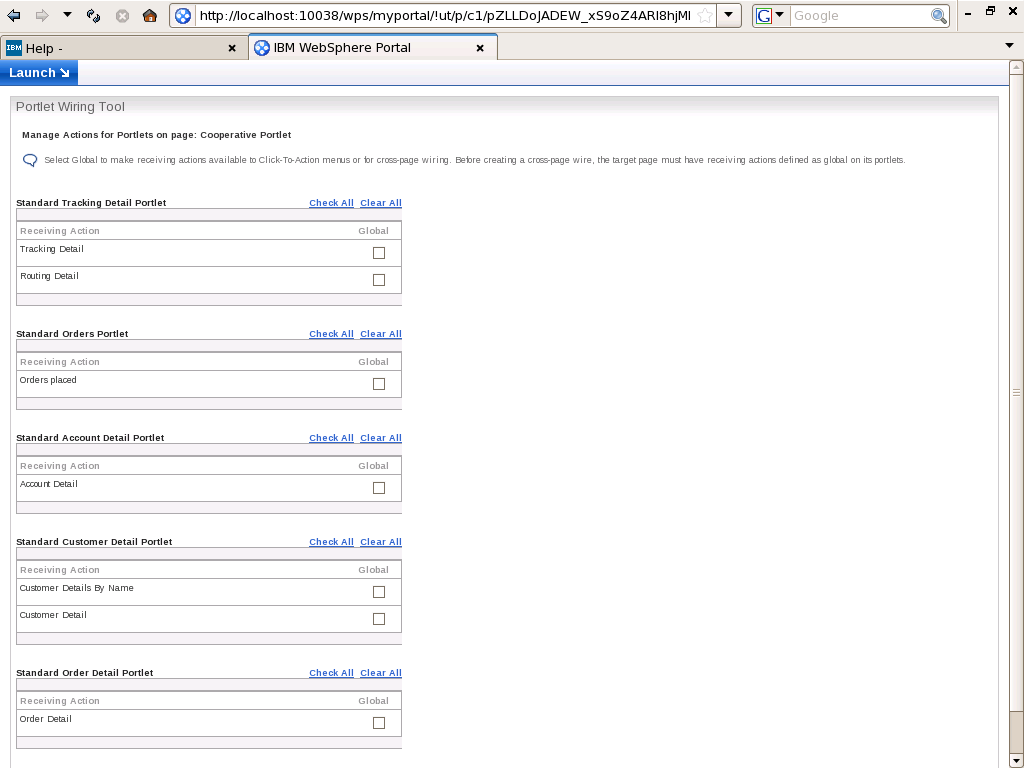
The Portlet Wiring Tool also provides the functionality to implement cross-page portlet communication. Cross-page wires allow portlets to exchange properties across pages. Before creating a cross-page wire, the target page must have receiving actions defined as global on its portlets. Setting an action as global will also make that action available to Click-to-Action menus. To set an action as global, navigate to the target page and select Edit Page Layout from the drop-down menu on the title bar. Then select the Wires tab and click on Manage Actions. This will bring up a listing of the portlets on a page and their corresponding receiving actions.
As an alternative to the Portlet Wiring Tool, wires can also be created interactively in the portlet. Depending on the browser, users with sufficient permissions can create wires by holding either the CTRL or ALT keys and clicking an icon or hotspot in the portlet that is already associated with a Click-to-Action function. A dialog is displayed that allows the user to create a wire to other portlets on the page.
In order to view the tool itself, users must possess at least "User" role permissions on the page and the portlet. Further access checks are performed before allowing the user to view, create, or delete wires between portlets. The user must possess at least "User" role permissions on a page and the wired portlets on it to be able to view wires for the page. Users may also be able to create or delete personal wires, which affect their view of the page, or create or delete public wires, which affect all users' view of the page. Users must possess at least "Privileged User" role permissions on the page and "User" permissions on the portlets to be able to create or delete personal wires, while at least "Editor" role permissions are required on the page and "User" permissions on the portlets to be able to create or delete public wires.

The Portlet Wiring Tool allows you to view the properties that portlets on the page can send or receive. If a match is available between two portlets, you can create a
wire between the two portlets. Existing wires may also be deleted using the tool..
The Portlet Wiring Tool also provides the functionality to implement cross-page portlet communication. Cross-page wires allow portlets to exchange properties across pages. Before creating a cross-page wire, the target page must have receiving actions defined as global on its portlets. Setting an action as global will also make that action available to Click-to-Action menus. To set an action as global, navigate to the target page and select Edit Page Layout from the drop-down menu on the title bar. Then select the Wires tab and click on Manage Actions. This will bring up a listing of the portlets on a page and their corresponding receiving actions.

As an alternative to the Portlet Wiring Tool, wires can also be created interactively in the portlet. Depending on the browser, users with sufficient permissions can create wires by holding either the CTRL or ALT keys and clicking an icon or hotspot in the portlet that is already associated with a Click-to-Action function. A dialog is displayed that allows the user to create a wire to other portlets on the page.
In order to view the tool itself, users must possess at least "User" role permissions on the page and the portlet. Further access checks are performed before allowing the user to view, create, or delete wires between portlets. The user must possess at least "User" role permissions on a page and the wired portlets on it to be able to view wires for the page. Users may also be able to create or delete personal wires, which affect their view of the page, or create or delete public wires, which affect all users' view of the page. Users must possess at least "Privileged User" role permissions on the page and "User" permissions on the portlets to be able to create or delete personal wires, while at least "Editor" role permissions are required on the page and "User" permissions on the portlets to be able to create or delete public wires.
Restrictions on Cooperative Portlet
These are the restrictions on the Cooperative portlets that apply to portlets developed using IBM Portlet API and Standard Portlet API
- The property broker does not support anonymous users. That is, for portlets on a page to transfer properties, the user must be logged in.
- The pop-up menu functionality requires browsers with JavaScript on the client.
- When multiple cross-page wires are triggered at the same time to different target pages, the first target page will have priority. Only the wires going to the first target page will work. The other events will be discarded.
- Wires created on a root page may not be created by default on any child derived page. They have to be recreated on the derived page.
Configure cooperative portlets
The term cooperative portlets refers to the capability of portlets on a page to interact with each other by sharing information. The WPS supports cross-page portlet communication for cooperative portlets, allowing portlets on different pages to communicate
Cooperation between source and target portlets is faciliated by by a WPS runtime entity called the property broker. The Cooperative portlets subscribe to a model of declaring, publishing and sharing information with each other using WPS property borker. Each portlet that wants to act as either producer or consumer declares its intention using a .wsdl file. At the time of installing a portlet WPS will read the .wsdl file and make entries in database about data type that portlet can either consume or produce. After installing a portlet administer should create a connection between source and target portlet using Portlet Wiring portlet. The Portlet wiring Portlet allows you to create connection only if the source and target portlet has matching data type.
There are some differences between the portlets developed using IBM Portlet API and Standard portlet API when it comes to cooperative portlets
1) You can create wire only between either two portlets developed using IBM Portlet API or two portlets developed using Standard Portlet API. You cannot create wire between a portlet developed using IBM Portlet API and a portlet developed using Standard Portlet API even if they have matching data type.
2)The Portlets developed using IBM Portlet API can publish a property either decleratively i.e. if wire is created between two portlets or programmatically using the Property Broker service API. But the portlets developed using Standard Portlet API can publish property only decleratively.
3) The Portelts developed using IBM portlet API's can use Click-to-Action, What that means is they can use C2A tags in the JSP for generating markup. Once you do that when you click on property it will display a context menu with list of all the consumer portlets for that portlet. You can click on one of the items in the menu to send event to consumer or you can broadcast that event to all the portlets who can consume that property. The Standard Portlets cannot use C2A JSP tags for publishing.
During the event phase, the property broker delivers notifications to cooperative portlets, and the cooperative portlets can notify the property broker of property value changes. An action may be delivered on one portlet as the result of a user clicking on an action link generated by the portlet in its markup. If cooperative portlets are used, this may result in other actions being triggered on other portlets. At any point during the event phase, a portlet may publish the value of an output property to the property broker. The portlet may provide a value at any time during the event phase. The property broker determines what needs to be done with the values. If wires exist for this property, the property broker will deliver the property value to the actions specified by the target end of the wires. This process may continue recursively; the property broker detects loops and breaks them. The property broker guarantees the completion of all property value notifications to target portlets by the end of the event phase.
Portlet deployment in clustered environment
If your WebSphere Portal server is installed on top of WAS ND or WAS XD, which most probably would be the case in non development environment then deployment of portlet would be little different than how you work on DEV environment.
When you deploy portlet on cluster using Portal Admin Console or XMLAccess first changes would be made in the portal database and then the portal server would forward control to Deployment manager which will push changes to all the servers in that portal once the changes are copied to all the nodes the portlet should be activated.
In case of clustered environment follow this procedure for either installing or updating the portal.
Second approach of installing portlets would be to first install it as Enterprise application using WAS and then allow DMGR to synchronize changes to all the nodes once that is done then inform Portal server about the portlet using XMLAccess pre deployed command. This approach is useful when you want to combine your portlet with other resources such as EJB, Web Services or other web modules. Follow these steps for deploying portlet
When you deploy portlet on cluster using Portal Admin Console or XMLAccess first changes would be made in the portal database and then the portal server would forward control to Deployment manager which will push changes to all the servers in that portal once the changes are copied to all the nodes the portlet should be activated.
In case of clustered environment follow this procedure for either installing or updating the portal.
- Deploy your portlets using either the WebSphere Portal Administration page or the XML configuration interface utility (xmlaccess command).
- Activate the deployed portlets in the cluster by running the "WPSconfig.bat activate-portlets" command. In addition to activating the portlets, this step causes the deployment manager to synchronize the changes across the cluster members.
Second approach of installing portlets would be to first install it as Enterprise application using WAS and then allow DMGR to synchronize changes to all the nodes once that is done then inform Portal server about the portlet using XMLAccess pre deployed command. This approach is useful when you want to combine your portlet with other resources such as EJB, Web Services or other web modules. Follow these steps for deploying portlet
- Install the EAR through Deployment Manager, using either the Applications > Install New Application option within the Administration Console, or the AdminApp install command within the wsadmin scripting client
- Map the application to each cluster where it is to run, using either the MapModulesToServers option of the AdminApp install command within the wsadmin scripting client, or the Map modules to servers option under that application’s entry under Applications > Enterprise Applications .
- Synchronize the new application with each node in all clusters, and start the application in each cluster. By default, synchronization will automatically occur with each node hosting servers and cluster members, or both, to which the enterprise application is mapped.
- Use the XMLAccess application to import a portlet definition into each portal cluster using the predeployed attribute, where the
element of the points to the binaries directory where the portlet application's WAR contents are contained. Choose only one cluster member in a cluster against which to run the XMLAccess import, and as a result all cluster members receive the update.
Manage deployment and removal of portal application
When you deploy a portlet on WPS two things happen first that portlet gets installed as Enterprise application on the underlying WebSphere Application Server and in addition to that WPS reads the portlet.xml and stores the configuration information in the database.
Now there are two different approaches of deploying portlet
Now there are two different approaches of deploying portlet
- Deploy portlet using WPS: In this approach you can deploy a portlet through the WPS infrastructure either by using the Manage Web Modules portlet or using XMLAccess script. When you deploy portlet through WPS, it first takes whatever configuration information it needs from the portlet’s WAR file, and then it generates a unique object ID for this portlet. WebSphere Portal then wraps the portlet’s WAR within an EAR definition, giving it a name based on the portlet’s display name, suffixed with the generated object ID. This guarantees that the portlet’s underlying enterprise application name is unique to this portal.
- Deploy portlet using WAS: Other approach of deploying portlet is first deploying EAR file using WAS Admin Console and then using XMLAccess script to inform WPS about the portlet i.e. activating portlet. This approach is useful if you want your portlet to access an EJB, in that case create EAR file containing EJB and portlet. Or second approach is you want to package more than one portlet applications into one EAR file(might be useful if those applications share some third party jar)
Copying Portlet and Portlet Application
One of the common business requirement is ability to copy a Portlet or Portlet application. Ex. Lets say you have a RSS Portlet you want two different instances of that portlet so that user can add either WebSphere RSS Portlet or CNN News Portlet to page, first one pointing to IBM Developerworks WebSphere Section feed and second one pointing to CNN news feed.
The administrator of portal can achieve this by first installing IBM RSS Portlet then go to Manage Portlet or Manage Application portlet and click on Copy. When you copy a Portlet application all portlets in that application gets copied. When you click on Copy portlet you will get a screen like this, here you can set different title for the copied portlet
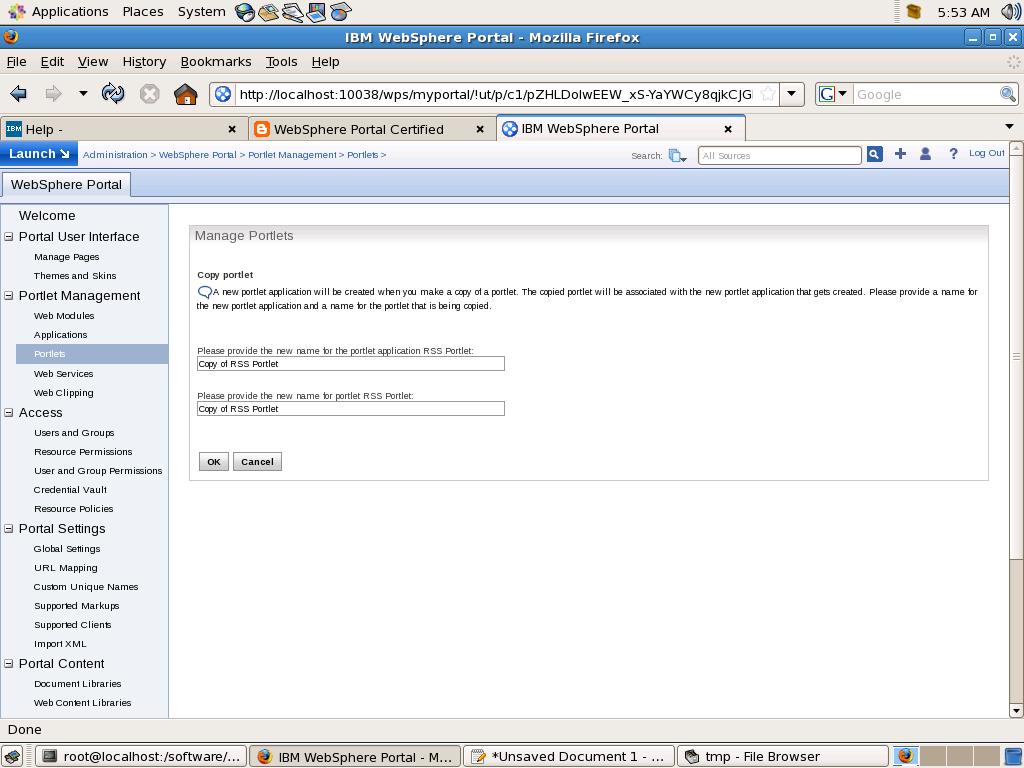
When you copy a portlet or portlet application the portlet data also gets copied. But after copying the portlet the administrator can change preferences of copy without affecting the original portlet.
One of the common cases for copying portlet is that you want say Virtual Portal specific settings. Ex. Lets say you have company news portlet by default it displays latest news for USA. You want to change it so that in case of Europe the Company News Portlet displays news for Europe. If thats the case make copy of Company News Portlet change preferences to display Europe news and make changes in ACL so that only users from Europe has access to it and also European users do not have access to main Company News Portlet.
About XMLAccess Interface
The XML configuration interface provides a batch processing interface for portal configuration updates. It allows you to export an entire portal confiugration or parts of configuration to XML file. Then you can import this XML file in someother portal server to recreate configuration.
You access the XML configuration interface using a command line tool. This command line client is a small separate program that connects to the portal server using HTTP/HTTPS connection. You can use it for configuring portal remotely.
To be able to use the XML Configuration interface you need to have the manager role on the virtual resource XML_ACCESS and the security administrator role on the virtual resource PORTAL. This implies that you must be a super administrator of the portal who can perform any action. Therefore there is no further access control.
Following types of requests that can be sent to the XML Configuration interface
Requets to and response from XML configuration interface use the same XML format. An export request generates an XML response that contains all the configuration data required to re-create the exported configuration part. This means that you can export a portal configuration, save the XML output file and, without modification, send it to another portal to re-create the same configuration there.
You access the XML configuration interface using a command line tool. This command line client is a small separate program that connects to the portal server using HTTP/HTTPS connection. You can use it for configuring portal remotely.
To be able to use the XML Configuration interface you need to have the manager role on the virtual resource XML_ACCESS and the security administrator role on the virtual resource PORTAL. This implies that you must be a super administrator of the portal who can perform any action. Therefore there is no further access control.
Following types of requests that can be sent to the XML Configuration interface
- Export Request: An export request triggers the export of complete or partial portal configuration into XML. It does not modify the configuration of the portal. it results in a response file
<request
    xmlns:xsi="http://www.w3.org/2001/XMLSchema-instance"
    xsi:noNamespaceSchemaLocation="PortalConfig_1.4.xsd"
    type="export"
    export-users="false">
</request> - Update request: An update request modifies the configuration of portal according to values found in the XML script.
<request build="wp6014_010_01" type="update" version="6.0.1.4" xsi:noNamespaceSchemaLocation="PortalConfig_6.0.1_2.xsd">
// Configuration that you want to import
</request> - Export orphaned data request: It exports the complete portal configuration into XML including orphaned data.
<request build="wp6014_010_01" type="Export-orphaned-data" version="6.0.1.4" xsi:noNamespaceSchemaLocation="PortalConfig_6.0.1_2.xsd">
</request>
Requets to and response from XML configuration interface use the same XML format. An export request generates an XML response that contains all the configuration data required to re-create the exported configuration part. This means that you can export a portal configuration, save the XML output file and, without modification, send it to another portal to re-create the same configuration there.
Administer the page security
One of the common uses of portal scripting interface is to use it for controlling access control. The Portal Scripting interface provides two different beans that allows you to manipulate the access control.
Lets say you want to modify the access control for "Test Page" page(Unique name for page is testpage). If thats the case then you should follow this procedure
Lets say you want to modify the access control for "Test Page" page(Unique name for page is testpage). If thats the case then you should follow this procedure
- Load the access control object for this page using
set acl [$Access getacl Content [$Content find page uniquename testpage]]
This will load all the access control information for this is acl object. - Once the access information for a resource is loaded in acl bean then you can decide if you want to either only view the information or edit the information. In our case since we want to edit the page information call
$PacList edit $acl - In the next step we can actual grant or revoke of the user role.
Ex.$PacList grant User special Authenticated
This will assign All authenticated users User role on the page$PacList revoke PrivilegedUser special Authenticated
This will remove Privileged Usre role for all authenticated users on this page.$PacList grant Editor name "johndoe"
This will assign Editor role to John Doe on this page - Once your done manipulating the access control information then you can commit your changes by calling
$PacList done
This command would write back your changes in Portal Access Control
Portal Scripting Interface Beans
The portal scripting component introduces so-called script beans into the JACL language. These are objects with methods that work on portal data. There is no JACL object that represent particular page or portlet. Rather, there is a fixed number of script beans that provide access to a specific areas of the portal data.
The available beans are
The available beans are
- Portal: The Portal bean is used for performing portal level operations such as login and logout. As well as setting the virtual portal for the current session($Portal setvp
) - Content: The Content bean allows you to interact with portal content hierarchy(Pages, labels, URLs).It allows you to create,update delete, move pages, labels, urls
- Layout: The Layout bean allows you to work with component hierarchy on a page. Component hierarchy contains horizontal and vertical containers, controls
- Portlet: The Portlet bean allows you to work with portlet repository which consist of portlets, portlet applications and web modules
- Look: The Look bean provides access to the portal theme and skin objects
- Access:The Access bean is for reading, writing of the access control objects
- PacList: The PacList bean provides operations to view and edit access control objects.
Run scripting command in a profile
A profile is a script that runs before the main script, or before entering interactive mode. Profiles can be used to set up environment specific behavior or user specific data. Profiles are specified when invoking wpscript, using the -profile parameter. For example, the login command can be placed in a profile. The following example of a profile, which can be named mylogin.jacl, would look like this:
Then you can execute your jacl script using this command
As you can see your passing name of your mylogin.jacl as value for -profile command line parameter. So the mylogin.jacl script will get executed before testme.jacl and as a result you dont have to include login command in each of your JACL scripts
set user wpsadmin
set pwd  wpsadmin
$Portal login $user $pwd
Then you can execute your jacl script using this command
wpscript.sh -port port_number -profile mylogin.jacl -username wasadmin -password wasadmin -f testme.jaclAs you can see your passing name of your mylogin.jacl as value for -profile command line parameter. So the mylogin.jacl script will get executed before testme.jacl and as a result you dont have to include login command in each of your JACL scripts
Introduction to Portal Scripting Interface
WPS provides a scripting interface that you can use for administering portal from the command line.The portal scripting interface is extension of the WAS Admin Scripting interface.
When you use portal scripting interface unlike the XMLAccess tool, WebSphere Portal is accessed with user identity, not as a "super administrator".
You can use the Portal Scripting interface in two different modes
When you use portal scripting interface unlike the XMLAccess tool, WebSphere Portal is accessed with user identity, not as a "super administrator".
You can use the Portal Scripting interface in two different modes
- Interaction mode: Use the interactive mode if you want to interact directly and dynamically with the portal to perform simple administrative tasks that should only be executed once. For example, the administrator wants to modify the permissions of a page for a certain principal, or the administrator wants to add a portlet to a page. Use the interactive mode if you do not intend to repeat the operation. Use these steps to use portal scripting in interactive modes
- Execute wpscript.sh -port port_number -user admin_userid -password admin_password command. This should open a wsadmin command console
- Login into portal using $Portal login wpsadmin wpsadmin command
- Execute whatevery wpsadmin commands you want to execute
- After you have completed all tasks by the portal scripting interface, close and exit the script processor. All changes that you committed are applied to the portal configuration.
- Scripting mode: Use the script mode to apply predefined changes to the configuration of a portal. The wpscript tool executes a JACL script that contains the administrative operations. The scripting client inherits the JACL processor from wsadmin, so an administrator can exploit the JACL scripting language, in order to write re-usable, extendable administration scripts. This mode is typically preferred if reproducible administration tasks are created: For example, the administrator can write a JACL script that produces a complete page subtree, and adds individual page layouts and portlets on each page. Follow these steps to use scripting mode
- Create a JACL script file containing the administrative commands for the changes that you would like to make
- Execute this command wpscript.sh -port port_number -f script_file_name.jacl
- Check the output from the script processor to ensure that no errors occurred during the execution of the script.
Delegated administrative policy
An administrator is a user who is authorized to modify the access control configuration by changing role assignments and creating or deleting role blocks. When you install portal or create new VP, you set an administrator user, who becomes the domain administrator and can admister all the resources in that domain.
WebSphere Portal also supports delegated administration, what that means is Portal Admin can give certain access rights to other user and that user can pass some of his user rights to other administrator. Take a look at this diagram. The wpsadmin is portal administrator, so he can assign say Editor or Privleged User role to Sunil for particular page in Asia Marketing team. He can also delegate administrative rights for Marketing team to Mark and then mark would be able to assign rights to Sunil for particular page or he can pass the Admin rights for pages under Asia Marketing to James and James would be able to assign the appropriate user Rights to Sunil.

WebSphere Portal has delegated administration policy that determines how users are permitted to delegate their privileges to other users or groups. The general policy for creating or deleting role assignment is as follows. A user Mark/marketingadmin can assign a Editor role to Sunil only in one of the following cases are met
So if Mark wants to assign Editor role to Sunil on Asia Marketing Page then he must have Delegator@Sunil + Security_Administrator@Asia Marketing Page + Editor@Asia Marketing Page.
WebSphere Portal also supports delegated administration, what that means is Portal Admin can give certain access rights to other user and that user can pass some of his user rights to other administrator. Take a look at this diagram. The wpsadmin is portal administrator, so he can assign say Editor or Privleged User role to Sunil for particular page in Asia Marketing team. He can also delegate administrative rights for Marketing team to Mark and then mark would be able to assign rights to Sunil for particular page or he can pass the Admin rights for pages under Asia Marketing to James and James would be able to assign the appropriate user Rights to Sunil.

WebSphere Portal has delegated administration policy that determines how users are permitted to delegate their privileges to other users or groups. The general policy for creating or deleting role assignment is as follows. A user Mark/marketingadmin can assign a Editor role to Sunil only in one of the following cases are met
- Mark has the Administrator@Portal or Security Administrator@Portal role. That means he is the super admin for portal.
- Since Mark is not super admin, he can assign Editor Role to sunil on one of the Marketing Portal pages only if all of the following conditions are met
- Mark has the Security Administrator@Markeing Page or Administrator@Marketing Page role
- Mark has atleast Editor@Marketing Page role.
- Mark has the Delegator@Sunil, Security Administrator@Sunil or Administrator@Sunil role. Its better to create asiamarketingusers/marketinguser group and assign admin rights to Mark on that group
So if Mark wants to assign Editor role to Sunil on Asia Marketing Page then he must have Delegator@Sunil + Security_Administrator@Asia Marketing Page + Editor@Asia Marketing Page.
Initial Access Control Settings
When you install portal server, the installation program will ask you for administrative user name. That user will become administrator of the portal. In addition to that the installation program will also create administrative group usually wpsadmins that group will get Administrative role on the portal.
This is set of permissions that portal installation program will assign
Take a look at Initial Access Control Settings for further information on what all rights are assigned to various user/groups during portal install
This is set of permissions that portal installation program will assign
- Administrative User: Gets unlimited access on all resources
- Administrative Group(wpsadmins): Same as that of administrative user
- All Authenticated Portal User: Gets User or Privileged User rights on preinstalled portlets and some of the pages that get created as part of install process
- Anonymous Portal User: Gets User rights on public pages such as login, selfcare, sitemap,..
Take a look at Initial Access Control Settings for further information on what all rights are assigned to various user/groups during portal install
Virtual Users and Groups
The portal supports predefined virtual users and groups that allow for access control configuration that applies to abstract sets of users. These virtual users and groups are not stored in the user registry. They only exist within the access control context. You cannot change group membership or other attributes of these virtual users and groups
- Anonymous Portal User: This virtual user models a portal user who has not yet logged into the portal. Assigning roles to this user on a resource allows access to this resource prior to authentication to the portal server.This is useful for creating public welcome pages. The Anonymous Portal User is not considered to be a member of any group within the portal.On pages and their virtual resource parents CONTENT_NODES and PORTAL, you can only assign the Anonymous Portal User to the User role type
- All Authenticated Portal Users: This virtual user group models the set of all users who are known by the portal. After successfully logging in to the portal, users lose the Anonymous Portal User identity and become authenticated members of the All Authenticated Portal Users virtual user group. Roles assigned to this user group allow establishment of permissions that will apply to all authenticated users and thus support setting up the default privileges for authenticated portal access.
- All Portal User Groups:This virtual user group contains all non-virtual user groups.
Private Page
A private page can be accessed only by its owner. Privileged Users (users assigned a role of type Privileged User) can explicitly create new private pages that are accessible only by themselves. Additionally, a Privileged User on a non-private page can personalize the page and create new private pages underneath it. Customizing a non-private page usually creates a private copy of the corresponding non-private page. Any changes that a Privileged User makes to a non-private page are not accessible by other users.
For private resources, which are resources accessible only by the owner of the resource, ownership provides the same set of allowed actions as the Privileged User role type plus the allowance to delete the resource. So in the case of both non-private and private resources, these allowed actions include the ability to delete the resource.Private resources can only be owned by users, not by user groups. It is not possible to define roles on private resources, and resource ownership cannot be inherited.
Note: Private pages cannot be controlled by an external security manager. Access control for private pages is always internally controlled by WebSphere Portal.
Application Roles
There is a higher level concept of roles called application roles. Application roles are identified by a unique name and can contain an arbitrary set of other roles (an example is Editor@Market News page and Editor@Market News portlet). This makes it possible to use application roles to bundle cohesive allowed actions, simplifying access control administration. Application roles with the same name in different database domains are correlated, so it is possible to aggregate roles from different database domains within one application role.
Access control portlets are not set up to handle application roles, but application roles can be handled through the XML configuration interface.
Access control portlets are not set up to handle application roles, but application roles can be handled through the XML configuration interface.
Meaning of Virtual Resource
This is description of all the virtual resources
- Content Nodes The root node of all pages, labels, and external URLs. Pages contain the content that determines the portal navigation hierarchy. If a new top-level page is created, it is automatically a child resource of the Pages virtual resource. If a new page is created beneath an existing page, the new page is automatically child of the existing page. Pages inherit access control configuration from their parent page unless role blocks are used.
- Designer Deploy Service Protects the ability to execute the automatic deployment feature of IBM Workplace™ Designer.
- Event Handlers Protects management of Event Handlers. This virtual resource has no child resources.
- External Access Control Protects modifying access control configuration for resources that are controlled externally by a security manager such as Tivoli Access Manager. Also protects the ability to externalize or internalize a resource. This virtual resource has no child resources.
- Markups Protects the ability to control markups for the portal. This virtual resource has no child resources.
- Portal This is the root node of all resources in the release domain. Roles on this resource affect all other resources in the release domain by default through inheritance unless role blocks are used. Resources in other domains like Templates and Policies are not affected through role mappings on this resource.
- Portal Settings Protects portal settings that can be modified through the Portal Settings Portlet or the XML configuration interface. This virtual resource has no child resources.
- Portlet Applications The root node of all installed portlet applications. Portlet applications are the parent containers for portlets. If a new Web module is installed, the portlet applications that are contained within that Web module are automatically child resources of the Portlet Applications virtual resource. Portlets that are contained within a portlet application appear as child nodes of that portlet application. Thus a two-layer hierarchy consisting of portlet applications and the corresponding portlets exists beneath the Portlet Applications virtual resource. Portlets inherit access control configuration from their parent portlet applications unless role blocks are used.
- PSE Sources The root node of all search collections. If a new search collection is created, it is automatically a child of this virtual resource. Roles on this resource affect all defined search collections unless role blocks are used. For further information about search collections refer to the Information Center section on Portal Search.
- Template Deployment Protects the deployment of arbitrary composite application templates into portal. This virtual resource has no child resources.
- URL Mapping Contexts The root node of all URL mapping contexts. URL mapping contexts are user-defined definitions of URL spaces that map to portal content. If a new top-level URL mapping context is created, it is automatically a child resource of the URL Mapping Contexts virtual resource. If a new URL mapping context is created beneath an existing context, the new context is automatically a child of the existing context. URL mapping contexts inherit access control configuration from their parent context unless role blocks are used.
- User Groups The root node of all user groups. Each user group in the portal inherits its access control configuration from the User Groups virtual resource. It is not possible to create role blocks on individual user groups.
- User Self Enrollment Protects the Selfcare and User Enrollment facilities (sign up and Edit My Profile). This virtual resource has no child resources.
- Users This virtual resource has no child resources. The Users virtual resource protects sensitive operations that deal with user management. For example, in order to add a user to a user group, you must have the Security Administrator@Users role. Users are implicitly protected resources. Users cannot be protected individually, but only through their group membership. As a result, it is not possible to have a role assignment on a specific user. Roles must be on user groups instead. So, you can edit Mary's user profile if you have a role assignment on some user group to which Mary belongs.
- Virtual Portal URL Mappings Protects the ability to modify a URL Mapping linked to a virtual portal.
- Web Modules The root node of all Web modules. Web modules are portlet WAR files that are installed on WebSphere Application Server. Web modules can contain multiple portlet applications. If a new Web module is installed, it is automatically a child of the Web Modules virtual resource. Roles on this resource affect all child resources (all installed Web modules) unless role blocks are used.
- WSRP This is the parent resource of the virtual resources WSRP Export and WSRP Producers. By default, roles on the WSRP resource affect the other two virtual WSRP resources and all WSRP resource instances via inheritance. As long as there are no role blocks in between, users who have role assignments on the WSRP resource have access rights on all WSRP resources.
- WSRP Export This virtual resource controls the ability of a user to provide and withdraw portlets as a WSRP Service.
- WSRP Producers This is the root node of all registered Producer instances. Each Producer that is registered in the portal inherits its access control configuration from the WSRP Producers virtual resource unless role blocks are used.
- XML configuration interface Protects the ability to execute XML configuration interface scripts. This virtual resource has no child resources.
Resources in JCR Domain
The following figure shows the hierarchy of resources in the JCR domain. These resources are related to Personalization, Document Libraries, Web Content Management, Application Templates, and Resources Policies
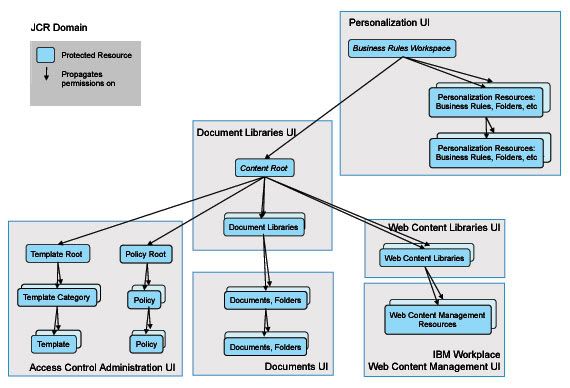
Resource Permission inheritance applies to this hierarchy as well as to the release domain. Permission granted on the JCR Content Root node are propagated to all children in the hierarchy. Use Application Templates, Policies, Document Libraries and Web Content Libraries, Inheritance and Propagation role blocks to reduce this propagation of permissions to children in the hierarchy.

Resource Permission inheritance applies to this hierarchy as well as to the release domain. Permission granted on the JCR Content Root node are propagated to all children in the hierarchy. Use Application Templates, Policies, Document Libraries and Web Content Libraries, Inheritance and Propagation role blocks to reduce this propagation of permissions to children in the hierarchy.
Managing Portal Access Control
You can use one of these tools for administering access control
By default access control data is stored in websphere portal database but you can configure external security manager to store part of access control data and to manage role assignment.
All unauthenticated users are considered anonymous users. Anonymous user has specific access to a resource or service.
The Administrator@Portal and Security Administrator@Portal roles contain a special permission that is not available to any other role. This permission allows the Administrator or Security Administrator to make arbitrary changes to the access control configuration of all resources. The Administrator and Security Administrator can create and delete roles, role assignments, and role blocks. If the configuration allows an external security manager such as IBM Tivoli Access Manager for e-business to manage role assignments, additional privileges need to be set to allow arbitrary changes to the access control configuration. To change the access control configuration for resources that are externally managed, you must have the Administrator@External Access Control or the Security Administrator@External Access Control role.
- Resource Persmissions
- User and Groups Permission
- Manage Users and Groups
- Portal Scripting interface
- XMLAccess
By default access control data is stored in websphere portal database but you can configure external security manager to store part of access control data and to manage role assignment.
All unauthenticated users are considered anonymous users. Anonymous user has specific access to a resource or service.
The Administrator@Portal and Security Administrator@Portal roles contain a special permission that is not available to any other role. This permission allows the Administrator or Security Administrator to make arbitrary changes to the access control configuration of all resources. The Administrator and Security Administrator can create and delete roles, role assignments, and role blocks. If the configuration allows an external security manager such as IBM Tivoli Access Manager for e-business to manage role assignments, additional privileges need to be set to allow arbitrary changes to the access control configuration. To change the access control configuration for resources that are externally managed, you must have the Administrator@External Access Control or the Security Administrator@External Access Control role.
How Access Control Information is stored in database
Resource data is stored in one of four different database domains. In order to allow for consistent database back-up and restore, the access control data protecting individual resources is always stored in the same database domain as the resource data. In each of the four domains, the individual protected resources are stored in a hierarchical fashion as a single tree of resources (also referred to as the protected resource hierarchy).
Resources can appear in different domains depending on the type of resource. JCR nodes are exclusively contained in the JCR domain. User customization data represented by private resources are exclusively contained in the customization domain. The community domain contains resources related to collaborative applications, and the release domain contains all remaining resources. Resources can be administered in the following ways:
Protected Resources of the release domain can be managed through the access control administration portlets and through the XML Configuration interface
Template and Policy resources are stored in the JCR domain and can also be managed through the access control administration portlets and through the XML Configuration interface
Resources in the community domain can only be managed through collaboration application specific administrative portlets. Resources in this domain are not shown in the access control administration portlets
The customization domain only holds private resources of users. No role assignments are possible in this domain, so resources in this domain are also not shown in the access control administration portlets
Note: Role inheritance never crosses domain boundaries, thus limiting the inheritance scope. Therefore, a role assignment for a user on the Content Nodes virtual resource in the release domain will only grant access to Content Nodes resources (pages) in the release domain.
Integrating external authorization systems
The WebSPhere POrtal server allows you to use a external security manager such as IBM's Tivoli Access Manager or Netegrity's siteminder for controlling authentication of portal resources. The Portal access control allows you to put individual subtrees of the protected resources hierarchy under external protection. For example using the resource permission portlet you can select a resource and change its externalization state. For example using Resource Permissions Portlet, you can select a resource and change its externalization state so that the resource and all resources in the subtree rooted at this resource are put under external access control. Inheritance always stops between resources that have different externalization state.
Portal server guarantees that each resource is either exclusively protected by portal access control or by the external system. Putting resources under external protection does not mean that the resource information as such is added to the protected object space of the external system. Only the roles that exist on those resources are registered there. An administrator of the external system can create role mappings for these roles, typically by assigning corresponding access control lists to the roles. The roles and role blocks are exclusively controlled by the portal. Only the mapping between roles and users/groups is managed through the external authorization system.
Ex. When you put the access control for Marketing Page under external access control then administer would be able to map users to role in the external access management system but what a role can do and the role block logic would still remain in the Portal
Changing the externalization status of resources is considered a sensitive operation and requires at least
Resources can be moved back and forth from internal to external control with the Resource Permissions portlet in WebSphere Portal. Explicit role assignments are preserved when moving in both directions. However, inherited role memberships are blocked for externalized resources. When you externalize access control for a resource, the resource is administered only through the external security manager interface. After externalization, role membership must be assigned and removed using the external security manager. The Resource Permissions portlet can no longer control user access to the resource; however, the Resource Permissions portlet can move the object back to internal control.
Portal server guarantees that each resource is either exclusively protected by portal access control or by the external system. Putting resources under external protection does not mean that the resource information as such is added to the protected object space of the external system. Only the roles that exist on those resources are registered there. An administrator of the external system can create role mappings for these roles, typically by assigning corresponding access control lists to the roles. The roles and role blocks are exclusively controlled by the portal. Only the mapping between roles and users/groups is managed through the external authorization system.
Ex. When you put the access control for Marketing Page under external access control then administer would be able to map users to role in the external access management system but what a role can do and the role block logic would still remain in the Portal
Changing the externalization status of resources is considered a sensitive operation and requires at least
Security Administrator@Portal and Security Administrator@External Access Control authority.This resource is put under external protection during portal installation and cannot be internalized.Resources can be moved back and forth from internal to external control with the Resource Permissions portlet in WebSphere Portal. Explicit role assignments are preserved when moving in both directions. However, inherited role memberships are blocked for externalized resources. When you externalize access control for a resource, the resource is administered only through the external security manager interface. After externalization, role membership must be assigned and removed using the external security manager. The Resource Permissions portlet can no longer control user access to the resource; however, the Resource Permissions portlet can move the object back to internal control.
- Private pages cannot be externalized.
- When you use the Resource Permissions portlet to externalize or internalize access control for a resource, access control for all of its public child resources moves with it. When you use the XML configuration interface (xmlaccess) to externalize or internalize access control for a resource, access control for public child resources does not change.
- After you externalize access control for a resource, you must use the external security manager to assign users to roles on the resource.
- After access control for a resource is externalized, you can use either the Resource Permissions portlet or the XML configuration interface to create additional role types on the resource. For example, suppose you create only the Administrator and Manager role types on the Market News Page. Then you externalize access control for the Market News Page. At this point, you must use the external security manager to assign users to the
Administrator@Market News PageorManager@Market News Pageroles. If you decide that you want to assign users to theEditor@Market News Pagerole, which has not yet been externalized, follow these steps:- Use the Resource Permissions portlet to create the Editor role type for the Market News Page.
- Use the external security manager to assign users to the Editor@Market News Page role by editing the ACL.
Remember that WebSphere Portal will still determine the permissions that are associated with the externalized Editor role type. - Externalizing the access control for a resource severs any access control inheritance from internally controlled parent resources. The user who is performing the externalization automatically receives the Administrator role on the parent resource of the externalized resource tree (if using the Resource Permissions portlet) or the resource (if using the XML configuration interface).
Introduction to Trust Association Interceptor
You can use an external authentication proxy to protect the portal by intercepting all requests targeted for portal destinations. An authentication proxy can be implemented as a proxy server such as WebSeal in ITCAM Or it can be implemented as a plug-in to the web server or to the IBM Edge server. Ex Webagent in Netegrity siteminder.
An external authentication component authenticates users by whatever means the external authentication component considers apporpriate. You will have to use Trust Association interceptor (TAI) registered with WAS to establish a trust relationship between WAS and authentication proxy. The authentication proxy passes authenticated users ID based on establish trust.
A Trust Association Interceptor (TAI) is a mechanism by which WebSphere Application Server enables an external component to authenticate the user and to assert the identity to the WebSphere Application Server Web container.
WebSphere Application Server provides functions which the TAI uses to indicate that it is able to handle a request and that the request is already authenticated. You could think of a TAI as an adapter, which communicates with the authentication component in an unspecified way and makes the authentication decisions accessible to WebSphere Application Server through the specified TAI interface.
Whenever a request attempts to access a secured resource, WebSphere Application Server invokes the TAI, which validates that the request comes from a legitimate third-party authentication proxy and returns the user's authenticated identity to WebSphere Application Server. The TAI should return either a distinguished name (DN) or a short name. WebSphere Application Server performs a registry lookup to verify the distinguished name or convert the short name to a distinguished name before searching for group memberships for that user. If the registry lookup fails, WebSphere Application Server refuses to trust the user. If the registry lookup succeeds, WebSphere Application Server generates a Lightweight Third-Party Authentication (LTPA) token for the user and stores it as a cookie for subsequent authentication during the user's session.
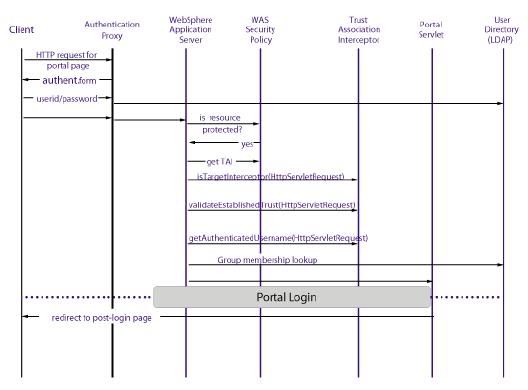
Figure shows the detailed flow of control for a request that passes through an external authentication proxy. The interactions shown are the same for authentication proxies implemented as separate servers, or for proxies implemented as plug-ins for the Web server or the Edge component.
A TAI is not necessary if the third-party authentication proxy provides native WebSphere Application Server identity tokens, such as a LTPA tokens. Currently, only Tivoli Access Manager WebSEAL and Tivoli Access Manager Plugin for Edge Server provide native WebSphere Application Server identity tokens.
The authentication proxy determines the challenge mechanism, and WebSphere Portal relies on the authentication proxy to relay success or failure of the user identifier through the TAI or LTPA token. WebSphere Application Server sees all requests from the TAI as authenticated, but WebSphere Application Server and WebSphere Portal still perform a user and group lookup on each request. Even if the authentication proxy has successfully authenticated, WebSphere Application Server and WebSphere Portal deny access if they cannot query the user in the registry. For example, it is possible to have a user in an External Security Manager (ESM) who is not accessible from WebSphere Portal because WebSphere Portal is configured to one user registry, which may not be the same registry or have the same registry configuration properties as the ESM has
Enabling SSO between WebSphere Portal and Domino
You configure the single sign-on (SSO) feature between the IBM® WebSphere® Portal server and the IBM Lotus® Domino® servers so that authentication works the same way for all Domino and Extended Products Portlets. A user can log into WebSphere Portal and then access portlets that contain information from a Lotus Domino application or service without having to enter additional credentials for authentication.
A best practice is to install and configure all Lotus Domino servers and then enable single sign-on for them all. For example, install and configure Lotus Domino messaging/applications servers, and servers for Lotus Sametime, before you enable single sign-on.
A best practice is to install and configure all Lotus Domino servers and then enable single sign-on for them all. For example, install and configure Lotus Domino messaging/applications servers, and servers for Lotus Sametime, before you enable single sign-on.
- All servers participating in single sign-on must be in the same Internet domain.
- To enable single sign-on, you must enable the IBM LTPA capabilities included in both WebSphere Application Server and Lotus Domino. The WebSphere LTPA token generated by WebSphere Application Server is imported into Lotus Domino, and this token can be used for all servers within the Lotus Domino domain. Verify that automatic LTPA key generation is disabled on each node of the single sign-on domain. For instructions, see Retrieving the WebSphere LTPA key.
- All servers participating in SSO must have same user registry
- Client browser should not have cookies disabled
Introduction to Lightweight Third-Party Authentication(LTPA)
Light Weight Third Party Authentication (LTPA) protocol is IBM's implementation of Single Sign on. IBM WebSPhere and Domino products use LTPA to allow single sign on. When LTPA is enable you can login into one WebSPhere Server and when you go to some other WebSPhere or Domino server it wont ask you for credential. Same thing you can login into a Domino first and when you go to other WebSPhere or DOmino servers that are participating in SSO, it wont prompt you for login.
To enable single sign-on, a common set of server encryption keys are created and exported across all servers that run the application. When users first access the site, they are challenged to log in with user ID and password, this information is verified against user registry Ex. LDAP, . Server will creates a security credential token with the LTPA service, and a cookie(this cookie wont be written to the browsers file system i.e. it is non-persistent) is written back to the browser. When the user later accesses another LTPA server in the same domain, information in the shared cookie is used to re-establish the user security context with LTPA. Hence, a second login prompt is unnecessary.
Important Note: One of the restrictions on using LTPA is that all the Servers participating in SSO should use same user registry
If in the future you change the LTPA key on one server then you will have to export it from that server and import it on all other servers participating in SSO
The LTPA cookie contains the following pieces of information:
The LTPA token is an encrypted string that contains the following pieces of information:
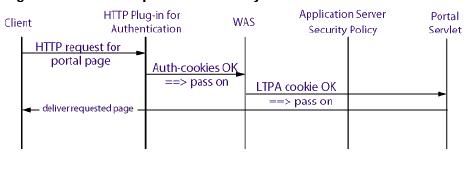
This is how the request is handled when user is logged in and he has valid LTPA cookie
To enable single sign-on, a common set of server encryption keys are created and exported across all servers that run the application. When users first access the site, they are challenged to log in with user ID and password, this information is verified against user registry Ex. LDAP, . Server will creates a security credential token with the LTPA service, and a cookie(this cookie wont be written to the browsers file system i.e. it is non-persistent) is written back to the browser. When the user later accesses another LTPA server in the same domain, information in the shared cookie is used to re-establish the user security context with LTPA. Hence, a second login prompt is unnecessary.
Important Note: One of the restrictions on using LTPA is that all the Servers participating in SSO should use same user registry
If in the future you change the LTPA key on one server then you will have to export it from that server and import it on all other servers participating in SSO
The LTPA cookie contains the following pieces of information:
- Cookie name: Always set to LtpaToken.
- Domain: Set to the Internet domain shared by all servers participating in single sign-on (example: mycompany.com).
- Cookie expiration: Set to delete this cookie at the end of the browser's lifetime.
- Secure: Set to on to force the use of Secure Sockets Layer (SSL). There is an LTPA configuration setting that creates cookies that are sent only through SSL.
Cookie value: This is set to the LTPA token as described below.
The LTPA token is an encrypted string that contains the following pieces of information:
- User data: Typically set to the user ID but can be any user information used to uniquely identify the user.
- Expiration time: Different from the Cookie expiration, this field is used to enforce a time limit that starts from the moment of login and is unaffected by browser activity or inactivity. The time limit is a configurable LTPA setting that defaults to 30 minutes.
- Digital signature: Used to validate the token.
This is how the request is handled when user is logged in and he has valid LTPA cookie

How credentail Vaults works
The credential vault is a portlet service that allows users/portlets to store credentials, that portlet can retrieve for logging into back end application
There are two kinds of Credentials; Active and Passive. Active Credentials allow you to establish connections via Basic Authentication, Lightweight Third Party Authentication (LTPA) token authentication or simple form-based user ID/password login challenges. Passive Credentials allow the retrieval of stored secret data such as, but not limited to, user ID and password or certificates

WPS provides one simple database vault implementation. By default the Credential vault is divided into two parts
Irrespective of how the slot is managed portlets can retrieve credentials from it.
WebSphere Portal’s Credential Vault defines four types of credential slots:
There are two kinds of Credentials; Active and Passive. Active Credentials allow you to establish connections via Basic Authentication, Lightweight Third Party Authentication (LTPA) token authentication or simple form-based user ID/password login challenges. Passive Credentials allow the retrieval of stored secret data such as, but not limited to, user ID and password or certificates

WPS provides one simple database vault implementation. By default the Credential vault is divided into two parts
- Administrator managed vault segment: This information is stored in release database. The administer managed vault segment is divided into slots(Each slot holds one credential i.e. user name and password pair). Each slot allows each user to store different password. ONly administrators can create slot in this segment
- User-managed vault segment. This information is stored in customization database. This segment is also divided into slots with difference that only one user can store one credential per slot. Portlets(acting on behalf of a portal user) can create in user slot in this segment.
Irrespective of how the slot is managed portlets can retrieve credentials from it.
WebSphere Portal’s Credential Vault defines four types of credential slots:
- Vault Slots in administrator-managed vault segments:
- A system slot stores system credentials where the actual secret is shared among all users and portlets. It is a shared slot that belongs to an administrative segment.
- An administrative slot allows each user to store a secret for an administrator-defined resource (for example, Lotus Notes). It is an unshared slot that belongs to anadministrative segment.
- Vault Slots in user-managed vault segments:
- A shared user slot stores user credentials that are shared among the user's portlets. It is a shared slot that belongs to the user segment.
- A portlet private slot stores user credentials that are not shared among the user's portlets. It is an unshared slot that belongs to the user segment.
Portal to back-end SSO
There are two different options for SSO between portal to back end system.
Some back-end systems can be accessed using standard technologies such as J2EE technologies(Datasources for RDBMS or J2C adapter) or web services. if portlet needs to inter operate with one of these back-end systems and do not need any sophisticated principal mapping mechanism, it is recommended that you use these technologies
For communication with other back-end systems that require proprietary or non-J2EE protocols WPS offers credential vautl as portlet service.
SSO from client to web application
You can provide SSO from the client to Web applications and portal two these two mechanism
The functional principal of these single sign-on solutions is essentially the same. Upon successful authentication the client gets a security token in the form of cookie(This is not persistent cookie, instead this cookie is deleted when clients browser session is closed) and the browser forwards this cookie to the servers web applications in that domain. The application server or Authentication proxies read authentication information from the cookie and let user in without reprompting for password
- Light weight thrid party authentication(LTPA):
- Authentication proxy:
The functional principal of these single sign-on solutions is essentially the same. Upon successful authentication the client gets a security token in the form of cookie(This is not persistent cookie, instead this cookie is deleted when clients browser session is closed) and the browser forwards this cookie to the servers web applications in that domain. The application server or Authentication proxies read authentication information from the cookie and let user in without reprompting for password
Introduction to Single Sign-on(SSO)
The goal of single sign-on is to provide a secure method of authenticating a user one time within an environment and using that single authentication(for the duration of the session) as a basis for access to other applications, systems and networks. In case of WPS there are two single sign-on realms;
1) the realm from the client to portal and other web applications- With this client can login into one web application/portal once and can access all other web applications that are part of the SSO realm.
2) from the portal to the backend applications: This enables a portal client to log into the portal once and then to access a number of back-end applications through respective portlets without having to authenticat at each of these applications.
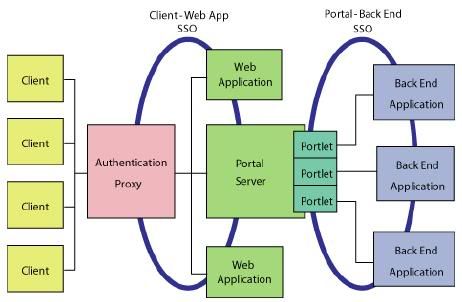

Setting up LDAP over SSL
Depending on the type of data that is exchanged between WAS, WPS and your LDPA server you can either configure your LDAP server over SSL or configure it to have direct access to WAS and Portal.
You might want to configure WAS and WPS to access to your LDAP user registry over SSL to ensure that confidentiality of the data exchanged between WAS/WPS and your LDAP. For example user password is sent over the network between LDAP user registry and WPS.This occurs to set the password if WebSphere Portal Express user management tools are used to create users and change passwords and also when WebSphere Application Server authenticates any user name and password pair through an LDAP BIND operation. Configuring LDAP over SSL can be important to protect sensitive data. Also, it might be required to ensure that user attributes that are retrieved from the directory are not viewed by someone watching packets on the network, if the attributes of a user include sensitive information or privacy is a concern.
In general, the task of setting up WebSphere Application Server and WebSphere Portal Express to use LDAP over SSL to the LDAP user registry consists of bringing the necessary certificates into key storage files that WebSphere Application Server and WebSphere Portal Express will use. The necessary certificates mentioned are the signing certificates for the LDAP server certificate. The important point to note is that any certificates required to establish the full certificate signing trust chain must be made available to WebSphere Application Server and WebSphere Portal Express. For a self-signed certificate, the certificate trust chain consists of only the one self-signed LDAP server certificate. For a certificate signed by a CA, the certificate chain confirming the identity and validity of the signing CA must be included. Either a purchased certificate or a self-generated CA signing certificate can be used.Some configuration setting changes must also be made to tell WebSphere Application Server and WebSphere Portal Express that LDAP over SSL should be used. Usually, it is only necessary to bring a signing certificate from the LDAP server to the WebSphere Application Server and WebSphere Portal Express. This step allows the authentication of the server side of the SSL connection. WebSphere Application Server and WebSphere Portal Express are LDAP clients to the LDAP user registry server. The client side is authenticated by doing an LDAP BIND within the SSL connection. The identity used by WebSphere Application Server to perform this BIND is the Bind DN configured on the WebSphere Application Server Security Console. The identity used by WebSphere Portal Express to perform this BIND is the adminId configured in portal_server_root/wmm/wmm.xml.
Steps for setting up LDAP over SSL
It is required that you first get LDAP(non-SSL) successfully working before setting up LDAP over SSL. This allows you to verify that the user registry is responding to LDAP requests before setting it up for SSL.
1. Install WebSphere Portal Express and WebSphere Application Server
2. Install and setup your LDAP
3. Generate or import certificates as necessary and activate SSL on the directory
4. Import certificates to WebSphere Portal Express to enable SSL connection. This process involves exporting the certificate from LDAP server in Base64-encoded ASCII data format as a .arm file. Then on the portal server side you can use ikeyman tool to import the certificate in Java Key Store(.jks ) format. While importing certificate make sure that you import it in .jks file which will be used by WAS server for LDAP over ssl. The WAS server provides a default repertoire called DefaultSSLSetting it contains default WAS trust file which is was_profile_root/etc/DummyServerTrustFile.jks.
5. Perform these steps on WPS. Go to WAS Admin console and check sslEnabled box. You can find it under Security> Global Security > LDAP. Also set LDAP Port to ssl port number.
6. Open portal_server_root/wmm/wmm.xml file in text editor. Navigate to the stanza that begins the ldapRepository name="wmmLDAP". Verify that value of ldapPort attribute is set to ssl port. Next add one more attribute to <ldapRepository> element sslTrustStore="was_profile_root/etc/DummyServerTrustFile.jks". Value of sslTrustStore parameter should be path of java key store format where you imported LDAP certificate.
If you dont specify an sslTrustStore parameter here then member will use app_server_root/java/jre/lib/security/cacerts.jks as trust store and you will have to import LDAP certificate in this file.
7. Restart WPS server.
Take a look at Step by step instructions for configuring LDAP over SSL document in Infocenter for detailed steps
Procedure for using SSL for Login and protecting part of portal
WebSphere Portal can be configured to support SSL. It can generate respective URLs if needed; Configuring WPS to communicate to browser on SSL is multistep process and some of the steps should be performed on the WAS and HTTP server.
1) Configure the Web Server to support HTTPs.If this is a production environment, you must obtain a certificate from a certificate authority. For testing purposes, you can use IKEYMAN to generate a self-signed certificate.
2) Configure WAS plugin for the web server to forward websphere traffic that is received over SSL to WAS.
3) If web server and portal server are on separate machine then you should establish trust between web server and application server.
4) Change value of these two properties in ConfigService
redirect.login.ssl=true
host.port.https=
The parameter redirect.login.ssl determines the protocol that is used when you click the login button. If this parameter is set to true, https is used. If this parameter is set to false, http is used. This setting is not affected by the protocol that is used to access the main page.
5) Now if you want to use SSL for all the authenticated pages in portal then you should export the wps.ear file and modify the web.xml file in wps.war like this
If you set the value of to NONE then only login process is done on SSL.
6) You should also change the login links in themes so that they use ssl. You will have to change theme jsps like this
7) Now repackage and deploy the wps.ear file on portal server.
8) Last change would be to set UseSecureLoginActionUrl config perference to true for Login Portlet.
1) Configure the Web Server to support HTTPs.If this is a production environment, you must obtain a certificate from a certificate authority. For testing purposes, you can use IKEYMAN to generate a self-signed certificate.
2) Configure WAS plugin for the web server to forward websphere traffic that is received over SSL to WAS.
3) If web server and portal server are on separate machine then you should establish trust between web server and application server.
4) Change value of these two properties in ConfigService
redirect.login.ssl=true
host.port.https=
The parameter redirect.login.ssl determines the protocol that is used when you click the login button. If this parameter is set to true, https is used. If this parameter is set to false, http is used. This setting is not affected by the protocol that is used to access the main page.
5) Now if you want to use SSL for all the authenticated pages in portal then you should export the wps.ear file and modify the web.xml file in wps.war like this
<security-constraint id="SecurityConstraint_1">
         <web-resource-collection id="WebResourceCollection_1">
            <web-resource-name></web-resource-name>
         <url-pattern>/myportal/*</url-pattern>

   <http-method>DELETE</http-method>
            <http-method>POST</http-method>
            <http-method>GET</http-method>
            <http-method>PUT</http-method>
         </web-resource-collection>
         <auth-constraint id="AuthConstraint_1">
            <description></description>
            <role-name>All Role</role-name>
         </auth-constraint>
         <user-data-constraint id="UserDataConstraint_4">
            <transport-guarantee>CONFIDENTIAL</transport-guarantee>
            // replace NONE by CONFIDENTIAL
         </user-data-constraint>
      </security-constraint>
If you set the value of
6) You should also change the login links in themes so that they use ssl. You will have to change theme jsps like this
<wps:if loggedIn="no" notSelection="wps.Login">
 <wps:urlGeneration contentNode="wps.Login"
            portletWindowState="Normal" ssl="true">
  <td class="wpsToolBar" valign="middle" nowrap>
   <a href="<% wpsURL.write(escapeXmlWriter); %>" class="wpsToolBarLink">
   <wps:text key="link.login" bundle="nls.engine"/>
   </a>
  </td>
 </wps:urlGeneration>
</wps:if>
7) Now repackage and deploy the wps.ear file on portal server.
8) Last change would be to set UseSecureLoginActionUrl config perference to true for Login Portlet.
Introduction to SSL
If your not familiar with SSL you might want to read What is SSL and what are Certificates. This is brief intro that might be helpful
Secure socket layer(SSL) establishes a private communication channel between two parties by enabling encryption of the data during transmission. Each SSL certificate consist of a public key and a private key. The public key is used to encrypt information and the private key is used to decipher it. When a browser points to a
secured domain a SSL handshake authenticates the server and the client. And encryption method is established with a unique session key and secure transmission can begin. Every SSL certificate is created for a particular server in a specific domain for a verified business entity. When the SSL handshake occurs the browser requires authentication information from the server.
WebSphere Portal takes advantage of WAS and Http Server Infrastructure for most of the SSL needs. But you can configure portal for things like
- Use SSL for login process only
- Use SSL for login and protecting part of the portal such as all the authenticated pages i.e. /myportal/* URLs
- By default portal does not use SSL for either login or protecting any part of the portal
Deregistering Users and Groups
IBM® WebSphere® Portal stores users and groups that exist in the user registry as entries in the portal database. When using the XML configuration interface or the Manage User and Groups Portlet to delete users and groups, they are deleted from the user registry as well as from the database. Deleting a user or group directly from the configured user registry does not remove the database entry.
To remove these users and groups from the database, follow these steps:
1. Export the affected user and group database entries by using the XML configuration interface.
2. Check the exported XML file and compare the exported entries with the user registry; for example, determine which users and groups you want to delete permanently, and which of the muted users and groups you want to re-enable.
3. From the exported XML file remove the users and groups that you want to keep in the database. All users and groups that remain in the file will be removed from the portal database.
4. Import the modified XML file with the XML configuration interface. The users and groups that are listed in the XML file are removed from the portal database.
Introduction to External Security Manager
The WebSphere Portal Server allows you to use external security manager such as Tivoli Access Manager or Netegrity's Siteminder for managing both authentication and access control (Authorization) for portal resources. WPs ships which authorization adapters for Tivoli Access Manager and Netegrity Siteminder.
Portal access control lets you put individual subtrees of the protected resource hierarchy under external protection. For example using the Resource permissions portlet you can select a resource and change its externalization state. As a result the selected resource and all resources contained in the subtree rooted at this resource are either put under external access control or brought back in to be protected by portal internal access control control depending on the specific externalization state chosen. Inheritance always stops between resources that have different externalization state.
This means that each resource is either exclusively protected by portal access control or by the external system. WHen you put a resource under external security manager, portal will still take care of making sure that user is able to perform only those actions for which role is assigned to him, only thing that will change is that mapping between roles and user/groups is managed through the external authorization system.
Role Blocks
Role blocks prevent inheritance through the resource hierarchy.
Two kinds of role blocks exist:
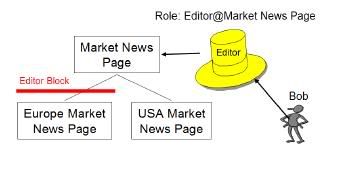
There could be situations where you dont want user to inherit roles. Ex. In this diagram Bob has Editor Role on Market News Page and because of inheritance he will get Editor role for both Eurpoean Market News Page and USA Market News Page. If you want you can block his role inheritance at European Market News Page, so that he does not get Editor role for either Eurpoean Market News Page or pages below it.
You can block roles using Resource Permissions Portlet like this
In this i am blocking Editor Role from being inherited from its parent. Similarly if you want to make John Doe editor of "Parallel Rendering Portlet" page you can un check Allow Propagation check box for Editor role
A role block is role type specific and tied to a specific resource. For example, an inheritance block for roles of type Editor on the Europe Market News page ensures that the Europe Market News page does not inherit any Editor role assignments from its parent resource, the Market News page. This role block does not affect inheritance of other role types. For example, Manager roles are still inherited. So, all users with the Manager@Market News Page role inherit the Manager@Europe Market News Page role unless a separate role block for the Manager role type exists.
Role blocks for roles of type Administrator and Security Administrator can only be inserted or removed through the XML configuration interface. For example, if Mary has the Administrator@Market News Page role, and the USA Market News Page is a child of the Market News Page, Mary automatically has the Administrator@USA Market News Page role. The Administrator@USA Market News Page role cannot be blocked with an inheritance or a propagation block set through the Portal Scripting Interface, or the User and Group Permissions or Resource Permissions portlets
All role types (including the Administrator and Security Administrator roles) are automatically blocked for the following types of resources:
For example, if access to the Market News page is controlled internally by WebSphere Portal , and the USA Market News Page is controlled externally by IBM Tivoli® Access Manager for e-business, none of the roles on the Market News Page are inherited by the USA Market News Page. So, if Mary has the role Editor@Market News Page, she does not automatically get the role Editor@USA Market News Page because the USA Market News page is managed externally. If both the Market News page and the USA Market News page are managed externally (or if both are managed internally), Mary inherits the role Editor@USA Market News Page unless a role block is used. In general, there is never any inheritance between two resources that differ in their externalization state. In other words, an externally protected resource never inherits from an internally protected resource and vice versa.
Two kinds of role blocks exist:
- Inheritance blocks: prevent a resource from acquiring role assignments from parent resources. Visualize this as inserting a block above the resource.
- Propagation blocks: prevent a resource from extending role assignments to child resources. Visualize this as inserting a block below the resource.

There could be situations where you dont want user to inherit roles. Ex. In this diagram Bob has Editor Role on Market News Page and because of inheritance he will get Editor role for both Eurpoean Market News Page and USA Market News Page. If you want you can block his role inheritance at European Market News Page, so that he does not get Editor role for either Eurpoean Market News Page or pages below it.
You can block roles using Resource Permissions Portlet like this

In this i am blocking Editor Role from being inherited from its parent. Similarly if you want to make John Doe editor of "Parallel Rendering Portlet" page you can un check Allow Propagation check box for Editor role
A role block is role type specific and tied to a specific resource. For example, an inheritance block for roles of type Editor on the Europe Market News page ensures that the Europe Market News page does not inherit any Editor role assignments from its parent resource, the Market News page. This role block does not affect inheritance of other role types. For example, Manager roles are still inherited. So, all users with the Manager@Market News Page role inherit the Manager@Europe Market News Page role unless a separate role block for the Manager role type exists.
Role blocks for roles of type Administrator and Security Administrator can only be inserted or removed through the XML configuration interface. For example, if Mary has the Administrator@Market News Page role, and the USA Market News Page is a child of the Market News Page, Mary automatically has the Administrator@USA Market News Page role. The Administrator@USA Market News Page role cannot be blocked with an inheritance or a propagation block set through the Portal Scripting Interface, or the User and Group Permissions or Resource Permissions portlets
All role types (including the Administrator and Security Administrator roles) are automatically blocked for the following types of resources:
- Private pages
- Externalized resources that have an internal parent resource
- Internal resources that have an externalized parent resource
For example, if access to the Market News page is controlled internally by WebSphere Portal , and the USA Market News Page is controlled externally by IBM Tivoli® Access Manager for e-business, none of the roles on the Market News Page are inherited by the USA Market News Page. So, if Mary has the role Editor@Market News Page, she does not automatically get the role Editor@USA Market News Page because the USA Market News page is managed externally. If both the Market News page and the USA Market News page are managed externally (or if both are managed internally), Mary inherits the role Editor@USA Market News Page unless a role block is used. In general, there is never any inheritance between two resources that differ in their externalization state. In other words, an externally protected resource never inherits from an internally protected resource and vice versa.
Role Assignment
WPS provides flexible role assignment. Ex. Lets say you want to assign Privileged User rights for Lotus Notes portlet so that he can change his Lotus Notes related preference, this does not mean that you would have to give him Privileged user rights at portal level, instead you can assign him those rights only for Lotus Notes portlet.
In case of WPS you can assign user roles at particular root level. What that means is if you assign Editor rights to John Doe for Marketing Page then he will get that rights for Marketing page as well as all the pages under marketing. Similarly if you assign Privileged role to John Doe for Portlet Application then he will get Privileged User rights for all the portlets in that particular portlet application.
If you want you can also assign a role to user at portal level. Ex. If you want make John Doe administrator of portal then you can go to Resource Permissions Portlet and click on Virtual resources -> Portal and assign Administrator role to John Doe.
Roles and Role types
In WPS you can asssign a particular role to user for particular resource. What that means is your saying that user can perform set of operations on protected resource. There are two ways in which you can assign permissions to user, first is either you assign it to user directly(implict) or you assign those permissions to a group and user is part of that group(explicit). The set of permissions granted to specific user is defined by the union of all permissions contained in all explicitly and implicitly assigned roles of this user.
The WPS server defines following role types
The roles are arranged in hierarchy
Each role type extends the privileges contained in the role types directly beneth it in the hierarchy. Ex. Contributor can do everything that User can do and Editor can everything that both Contributor and User can do.
The WPS server defines following role types
- User: Viewing portal content.
- Privileged User: Viewing portal content, personalizing portlets and pages and creating new private pages
- Contributor: Viewing portal content and creating new resources. The contributor role type does not include the permissions to edit resources. It only allows you to create new resource
- Editor: Creating new shared resources and configuring existing resources that are used by multiple users.
- Manager: Creating new shared resources as well as configuring and deleting existing resources that are used by multiple users
- Security Administrator: Creating and deleting role assignments on resources. Being assigned Security Administrator role at some resource means that the user shall be allowed to act as a delegated administrator for that resource, in other words the Security Administrator on a resource is allowed to delegate a subset of their privileges on the resource to other people according to the Delegated Administration Policy. For example, a user who is assigned Security Administrator and Editor role on a resource can assign this Editor role to other people provided he has Delegator role on those people. Having the Security Administrator role on a resource alone does not give view or edit access to the resource.
- Administrator: Unrestricted access on resources. This includes creating, configuring, and deleting resources. Administrators can also change the access control settings on resource; in other words grant other people access to those resources.
- Delegator: Assigning the Delegator role to principals (users and groups) allows roles to be granted to them. Having the Delegator role on other resources, such as specific portlets, is not useful. The set of roles that can be granted to those principals is defined through the Security Administrator and Administrator role types. For example a user has a Delegator role on the SalesTeam user group but no Delegator role on the Managers user group, so this user can grant roles only to the SalesTeam or individual members of the SalesTeam user group but not to the Managers user group. Having the Delegator role on a resource does not give direct access to the resource. The purpose of the Delegator role type is to allow the granting of roles to users or groups, so assigning Delegator role on resources or resource types that are not users or user groups will not grant those users additional privileges.
The roles are arranged in hierarchy

Each role type extends the privileges contained in the role types directly beneth it in the hierarchy. Ex. Contributor can do everything that User can do and Editor can everything that both Contributor and User can do.
Protected Resource
In order to make management of actions simpler the portal server has arranged the resources in hierarchy i.e. Lets say you have a Portlet Application that contains 5 Portlet, you want John Doe to act as manager or all those 5 portlets so instead of going and adding John Doe as manager for each of the portlet you can go and add him as manager or the Portlet Application (Portlets are children of the portlet application).

The vast majority of the resources within this hierarchy represent portal resource instances that require access control protection (such as individual portal pages or portlets); but some of them are special virtual resources.
Virtual resources are used in two ways:
1. They guard sensitive operations that do not affect specific resource instances as such but the whole portal or a whole portal concept. For example, the virtual resource XmlAccess is used to protect the ability to use the XmlAccess configuration tool.
2. They group resources of the same or related resource types. For example, the virtual resource Content Nodes is the root node of all pages (resource instances of resource type Content Node) within the portal page hierarchy
Introduction to Portal Access Control (PAC)
Portal Access Control is single decision point within the WebSphere Portal Server. It controls access to all the protected resources.
The Portal server has a concept of protected resource Ex. Portlet, Page, Xmlaccess,.. Portal defines set of actions that can be performed on the resource Ex. Creating a page, deleting a page, updating a page,... In order to control what all actions a user can perform on resource portal has introduced concept of role. Ex. User role means you can perform only read action and admin role means you can perform read, add, update and delete action. So when you want a user John Doe to only view particular page but not update and delete the page then you should assign User role to him for that page. But if you want user John Doe to be able to update and delete page then you should assign him Manager role which allows him to perform update, delete actions on that resource.
The Portal server has a concept of protected resource Ex. Portlet, Page, Xmlaccess,.. Portal defines set of actions that can be performed on the resource Ex. Creating a page, deleting a page, updating a page,... In order to control what all actions a user can perform on resource portal has introduced concept of role. Ex. User role means you can perform only read action and admin role means you can perform read, add, update and delete action. So when you want a user John Doe to only view particular page but not update and delete the page then you should assign User role to him for that page. But if you want user John Doe to be able to update and delete page then you should assign him Manager role which allows him to perform update, delete actions on that resource.
User registry and Member Repository
In the context of WAS a user registry stores all user and group data, including user ID and password, other group attributes and user and group member information, etc. The WebSphere Application Server supports three types of user registries
Within WPS only LDAP and custom user registries are supported, not the Local Operating System, this is because of the configuration of the Light Wight Third-Party Authentication (LTPA) mechanism used in Single Sign On
In the context of WebSphere Portal and Member Manager, a member repository is the store
for user profile data and the group data, and their membership information. Two different
terms (user registry and member repository) are used because it is possible for the
datastores to be different. For example, when the portal server requires application specific
user attributes that are not available in LDAP server, the administrator can opt to use the
Look-Aside mechanism provided by WebSphere Member Manager. Thus the member
repository has the extension in the LookAside database tables. In most cases, however, the
user registry and member repository are in the same datastores.
WMM supports three types of member repositories,
WMM has provided its own Custom User Registry(CUR) implementation(Custom the Custom User Registry API provided by WAS) to be used in the configuration of application server. The WMM provides two repository implementations
When a customer user registry (CUR) is developed by the customer, a corresponding custom
member repository (CMR) must be coded for configuring WMM. The CMR API is private and
unpublished. To obtain this API, IBM support must be contacted and an non-disclosure
agreement must be signed.
The security of an out-of-box installation of version 6 WebSphere Portal is enabled with the
WMMUR DB option based on the embedded version of IBM Cloudscape Database. The idea
is for the administrator to have a working system right after the installation.
- Local Operating System
- Lightweight Directory Access Protocol(LDAP)
- Custom user registry
Within WPS only LDAP and custom user registries are supported, not the Local Operating System, this is because of the configuration of the Light Wight Third-Party Authentication (LTPA) mechanism used in Single Sign On
In the context of WebSphere Portal and Member Manager, a member repository is the store
for user profile data and the group data, and their membership information. Two different
terms (user registry and member repository) are used because it is possible for the
datastores to be different. For example, when the portal server requires application specific
user attributes that are not available in LDAP server, the administrator can opt to use the
Look-Aside mechanism provided by WebSphere Member Manager. Thus the member
repository has the extension in the LookAside database tables. In most cases, however, the
user registry and member repository are in the same datastores.
WMM supports three types of member repositories,
- database
- LDAP
- Custom member repository
WMM has provided its own Custom User Registry(CUR) implementation(Custom the Custom User Registry API provided by WAS) to be used in the configuration of application server. The WMM provides two repository implementations
- com.ibm.websphere.wmm.registry.WMMUserRegistry : If you enable security to and your using LDAP as user repository then the User registry type would be set to Custom and name of the custom registry class name would be com.ibm.websphere.wmm.registry.WMMUserRegistry
- com.ibm.ws.wmm.db.DatabaseRepository:.
When a customer user registry (CUR) is developed by the customer, a corresponding custom
member repository (CMR) must be coded for configuring WMM. The CMR API is private and
unpublished. To obtain this API, IBM support must be contacted and an non-disclosure
agreement must be signed.
The security of an out-of-box installation of version 6 WebSphere Portal is enabled with the
WMMUR DB option based on the embedded version of IBM Cloudscape Database. The idea
is for the administrator to have a working system right after the installation.
WebSphere Member Manager Unique Id
Every member managed by Member Manager requires a unique identifier, that allows a member profile to be easily retrieved. Member manager provides two types of unique identifiers
The memberDN therefore uniquely identifies a member at a single point in time while the
memberUniqueId, due to its characteristic of never being reused, uniquely identifies a
member over time. When an application, such as WebSphere Portal, uses Member Manager, the application may have its own application-specific repository for data that is related to the member in Member Manager. This means the application needs a linkage for the data of a member managed by Member Manager and its own application-specific data for the same member. Since the memberDN may be changed and reused, in general it is not suitable to be used as the linkage. However, memberUniqueId, which is unique, static, and never reused, is suitable to be used as the linkage. In WPS the member unique identifier is called external ID or extId. The Portal Access Control utilizes extId as the primary key in permission database tables, linking the user and groups to the access control data.
- memberDN is a distinguished name of member convenient for identification and display purpose. The memberDN is unique and may be changed and reused (i.e. after a member is deleted from WMM a new member can be created and reuse the memberDN of the deleted member). An example of memberDN for Jane Doe is uid=janedoe,ou=people,ou=sales,o=acme.com
- memberUniqueId is unique static and never reused. That is, once a memberUniqueId
for a member is created, the value of that memberUniqueId will not be changed and even
if the member is deleted. The memberUniqueId can be mapped to a unique attribute in LDAP server.
The memberDN therefore uniquely identifies a member at a single point in time while the
memberUniqueId, due to its characteristic of never being reused, uniquely identifies a
member over time. When an application, such as WebSphere Portal, uses Member Manager, the application may have its own application-specific repository for data that is related to the member in Member Manager. This means the application needs a linkage for the data of a member managed by Member Manager and its own application-specific data for the same member. Since the memberDN may be changed and reused, in general it is not suitable to be used as the linkage. However, memberUniqueId, which is unique, static, and never reused, is suitable to be used as the linkage. In WPS the member unique identifier is called external ID or extId. The Portal Access Control utilizes extId as the primary key in permission database tables, linking the user and groups to the access control data.
Introduction to WMM
Portal server uses WebSphere Member manager (WMM) for its user and group management through an abstract layer called Portal User Management Architecture (PUMA).WMM supports four types of members Person, Group, Organization Unit and organization. Each member has profile that describes its characteristics within the system. The Portal server access control mechanism understands only two types Person and Group
WMM provides these functionality
Optionally you can use a look-aside profile registry adapter to interact with a look-aside repository which is database confirming to schema defined by WMM. The look aside repository is used for storing user attributes that cannot be stored in LDAP, reasons couldbe LDAP might be readOnly and you dont want to change schema of LDAP. The adaptor for lookaside is referred to as wmmLookAside. Although you can technically use wmmLookAside in conjunction with wmmDB repository it is likely unnecessary since all functionality supported by the wmmLookAside is also supported by wmmDB
WMM provides these functionality
- A Common mechanism to access member profiles that are made of attributes regardless of where and how the data of member profile is stored.
- A set of services to manage profiles such as create, read, update, remove and search members in profile repository.
- Group Management: Assigning members to group or removing members from group and querying group membership.
- A database profile repository adapter to interact with a database profile repository. The database should follow the schema defined by WMM. The database adapter is referred to as wmmDB
- LDAP profile adapter to interact with LDAP servers. The LDAP adapter is referred to as wmmLDAP. The wmmLDAP is abstraction layer and there is a adapter module for each type of supported LDAP.
Optionally you can use a look-aside profile registry adapter to interact with a look-aside repository which is database confirming to schema defined by WMM. The look aside repository is used for storing user attributes that cannot be stored in LDAP, reasons couldbe LDAP might be readOnly and you dont want to change schema of LDAP. The adaptor for lookaside is referred to as wmmLookAside. Although you can technically use wmmLookAside in conjunction with wmmDB repository it is likely unnecessary since all functionality supported by the wmmLookAside is also supported by wmmDB
How does the websphere portal server picks default page
Someone asked me a question that how does WebSphere portal decides the first page that should be displayed to the user after login and can i change that page/ or display my own page
Answer is yes you can change the page. The way it works in case of websphere portal is all the pages, labels are arranged in the hierarchical manner. The Content Root (unique id wps.content.root) is the root of the hierarchy. When you install websphere portal the content root would have these 2 as first 2 labels as children
The way WPS works is it will take the read the first children if that children is a label it will read its first child and use it as default page after login if that is a page.
If you want to dispaly your custom portal page then either you can create your custom home page as first child under ibm.portal.Home or you can create your own label as first child Content root and add your custom page as first child.
If you add your Custom Label or Custom Page under Content root then it will displayed in the Menu that is launched by clicking on Launch button.
Answer is yes you can change the page. The way it works in case of websphere portal is all the pages, labels are arranged in the hierarchical manner. The Content Root (unique id wps.content.root) is the root of the hierarchy. When you install websphere portal the content root would have these 2 as first 2 labels as children
- Home(ibm.portal.Home)This site area contains pages that are displayed to the end user. Home is label and it will have children pages like Welcome, Getting Started by default and welcome page is displayed to the user as soon as he logs in
- Administrator(ibm.portal.Getting Started): A label containing pages with portlets used by portal administrators.
The way WPS works is it will take the read the first children if that children is a label it will read its first child and use it as default page after login if that is a page.
If you want to dispaly your custom portal page then either you can create your custom home page as first child under ibm.portal.Home or you can create your own label as first child Content root and add your custom page as first child.
If you add your Custom Label or Custom Page under Content root then it will displayed in the Menu that is launched by clicking on Launch button.
Admin commands for managing LDAP Server
I did installed IBM Tivoli Directory Server 6.1 as User Repository for my WPS. These are the basic admin commands that i need to execute for managing my server
Starting IDS
Stopping IDS
Second approach is starting the Admin Console and starting and stopping LDAP server from there. But when i try to start the server it throws error
Starting IDS
- Go to /opt/IBM/ldap/V6.1/sbin
- Execute ./idsslapd -I idsinst
Stopping IDS
- Go to /opt/IBM/ldap/V6.1/sbin
- Execute ./idsslapd -I idsinst -k
Second approach is starting the Admin Console and starting and stopping LDAP server from there. But when i try to start the server it throws error
Using log.properties file
By default the Websphere Portal Server writes debugging trace message in same file as that of WebSphere Application Server. But if you want you can change it so that the debugging trace information generated by WebSphere Portal Server goes to separate file.
In order to enable this feature you will have edit/shared/app/config/log.properties file which looks like this by default
#
# Specifies if WebSphere Portal Server writes to the WebSphere Application
# Server log files or uses its own log file.
#
# Default: true
useAppServerLog = true
#
# The name of the WebSphere Portal Server's log file.
# This setting is ignored if the WebSphere Application Server's log files are
# used.
#
# The following tokens are replaced by the corresponding values:
# $APPSERVER_NAME The name of the WAS node, this should be used for vertical
# clusters to enforce that the different nodes write into
# different files or directories
# $CREATE_TIME The time a file was created
#
# Default: log/wps_$CREATE_TIME.log
logFileName = log/wps_$CREATE_TIME.log
In this file value of useAppServerLog property defines if you want portal to use different log file. By default it is set to true so portal server writes to trace.log file. If you set it to false(Means use differnet log file) then portal server will read value of logFileName property to find the location of log file where the trace messages should be written.
Once you make changes in log.properties file you will have to restart the server for these changes to take affect. After you restar the server the log generated by portal component such as PUMA log will go to seperate file.
In order to enable this feature you will have edit
#
# Specifies if WebSphere Portal Server writes to the WebSphere Application
# Server log files or uses its own log file.
#
# Default: true
useAppServerLog = true
#
# The name of the WebSphere Portal Server's log file.
# This setting is ignored if the WebSphere Application Server's log files are
# used.
#
# The following tokens are replaced by the corresponding values:
# $APPSERVER_NAME The name of the WAS node, this should be used for vertical
# clusters to enforce that the different nodes write into
# different files or directories
# $CREATE_TIME The time a file was created
#
# Default: log/wps_$CREATE_TIME.log
logFileName = log/wps_$CREATE_TIME.log
In this file value of useAppServerLog property defines if you want portal to use different log file. By default it is set to true so portal server writes to trace.log file. If you set it to false(Means use differnet log file) then portal server will read value of logFileName property to find the location of log file where the trace messages should be written.
Once you make changes in log.properties file you will have to restart the server for these changes to take affect. After you restar the server the log generated by portal component such as PUMA log will go to seperate file.
Using Enable Trace portlet
You can enable trace for portal server component temporarily by going to WebSphere Portal -> Administration -> Enable Trace Portlet.
For example you want to enable trace for PUMA then you can go to enable tracing portlet and add these strings
Note one very important thing that whatever changes you make in Enable tracing portlet will take effect immediately and will be lost when you restart the server. It is same as making changes using the runtime configuration tab in WAS Admin Console
Now your enable tracing portlet should look like this
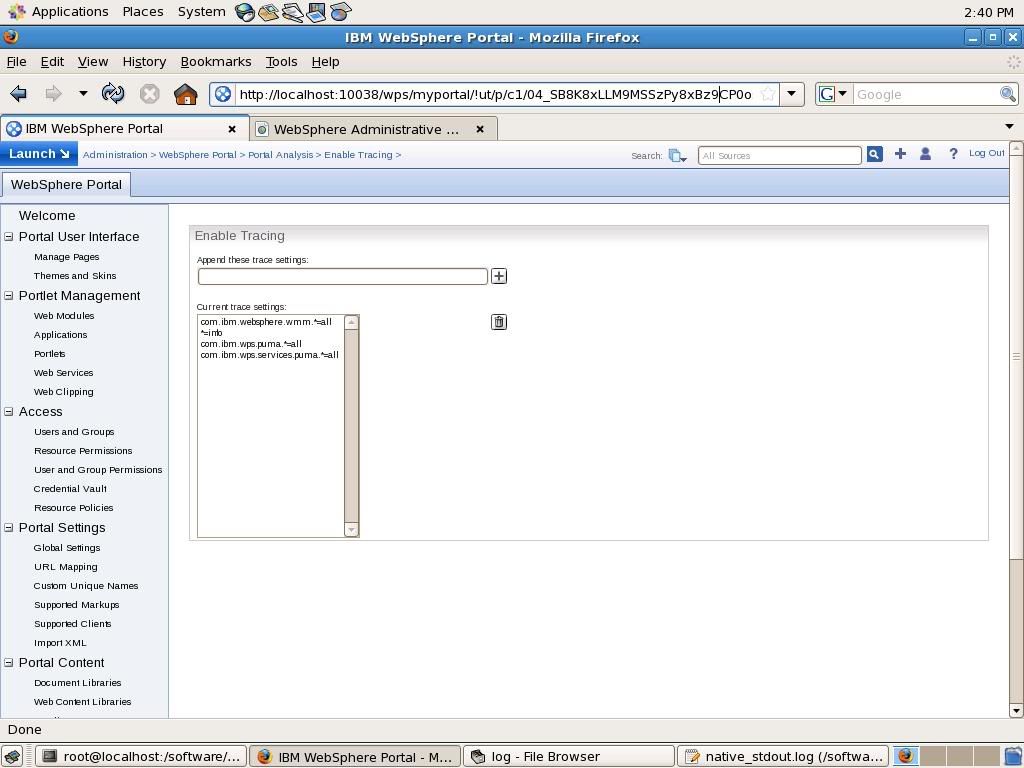
Once your done debugging your problem you can disable the tracing by deleting all the trace string except *=INFO
For example you want to enable trace for PUMA then you can go to enable tracing portlet and add these strings
com.ibm.wps.puma.*=all
com.ibm.wps.services.puma.*=all
Note one very important thing that whatever changes you make in Enable tracing portlet will take effect immediately and will be lost when you restart the server. It is same as making changes using the runtime configuration tab in WAS Admin Console
Now your enable tracing portlet should look like this

Once your done debugging your problem you can disable the tracing by deleting all the trace string except *=INFO
Utilizing log for troubleshootin
The WebSphere Portal Server uses System Event logging facility as logging framework Ex. Portal Server components such as Portal Aggregation engine, Personalization engine,, etc write to the System Event log. This facility is based on top of WebSPhere Application Server Trace facility. If your administrator then the System Event logging can provide you with information on abnormal events such as errors that occured during the operation of portal.
When you open a support request with IBM normally they will ask you to collect trace generated by system event logging from your system and send it to them. Ex. If your facing some problem in say registering new user or in the edit profile of existing user then they will ask you to collect trace for User Registry related PUMA component
The System Event log messages can be divided into two types
The messages logging is enabled by default and it writes messages in the SystemOut.log and SystemErr.log. Ex if you go to enable tracing portlet and add additional trace string then it will write these messages to SystemOut.log
[/WEB-INF/jsp/ManageLogView.jsp]: Initialization successful.
[10/10/08 13:54:13:732 EDT] 0000008e ManagerAdmin I TRAS0018I: The trace state has changed. The new trace state is *=info: com.ibm.websphere.wmm.*=all:com.ibm.ws.wmm.*=all:WSMM=all:com.ibm.wps.services.puma.*=all.
[10/10/08 13:54:30:106 EDT] 0000008d ManagerAdmin I TRAS0018I: The trace state has changed. The new trace state is *=info: com.ibm.websphere.wmm.*=all:com.ibm.ws.wmm.*=all:WSMM=all:com.ibm.wps.services.puma.*=all:com.ibm.wps.puma.*=all.
[10/10/08 13:55:05:402 EDT] 0000007b ServletWrappe A SRVE0242I: [wps] [/wps] [/themes/html/IBM/mainMenu.jsp]: Initialization successful.
Enabling trace logging causes a performance impact so it is disabled by default. You can able the trace logging using the WAS Admin Console or Portla Admin Console. Normally when you enable trace logging you will enable it for particular java package or class. For example you want to debug problems related to User Profile creation and update so you can go to Portal Infocenter and find out name of the authentication related java packages in Portal Server and you will get these trace string.
Once you have the trace string you can enable using one of the two methods
When you open a support request with IBM normally they will ask you to collect trace generated by system event logging from your system and send it to them. Ex. If your facing some problem in say registering new user or in the edit profile of existing user then they will ask you to collect trace for User Registry related PUMA component
The System Event log messages can be divided into two types
- Message Logging:WebSphere Portal Server provides the logging of messages that report errors and status information. The messages can be divided into ERROR, WARNING and INFO type
- Trace Logging:WebSphere Portal Express provides the logging of debugging messages called traces. These traces are useful for fixing problems. However, to save system resources, they are switched off by default.
The messages logging is enabled by default and it writes messages in the SystemOut.log and SystemErr.log. Ex if you go to enable tracing portlet and add additional trace string then it will write these messages to SystemOut.log
[/WEB-INF/jsp/ManageLogView.jsp]: Initialization successful.
[10/10/08 13:54:13:732 EDT] 0000008e ManagerAdmin I TRAS0018I: The trace state has changed. The new trace state is *=info: com.ibm.websphere.wmm.*=all:com.ibm.ws.wmm.*=all:WSMM=all:com.ibm.wps.services.puma.*=all.
[10/10/08 13:54:30:106 EDT] 0000008d ManagerAdmin I TRAS0018I: The trace state has changed. The new trace state is *=info: com.ibm.websphere.wmm.*=all:com.ibm.ws.wmm.*=all:WSMM=all:com.ibm.wps.services.puma.*=all:com.ibm.wps.puma.*=all.
[10/10/08 13:55:05:402 EDT] 0000007b ServletWrappe A SRVE0242I: [wps] [/wps] [/themes/html/IBM/mainMenu.jsp]: Initialization successful.
Enabling trace logging causes a performance impact so it is disabled by default. You can able the trace logging using the WAS Admin Console or Portla Admin Console. Normally when you enable trace logging you will enable it for particular java package or class. For example you want to debug problems related to User Profile creation and update so you can go to Portal Infocenter and find out name of the authentication related java packages in Portal Server and you will get these trace string.
com.ibm.wps.engine.*=all:
com.ibm.wps.services.puma.*=all:
com.ibm.wps.puma.*=all:
com.ibm.wps.sso.*=all:
com.ibm.wps.services.authentication.*=all
Once you have the trace string you can enable using one of the two methods
Subscribe to:
Posts (Atom)